珠海中英文网站建设2022最近热点事件及评述
Spring框架学习一—IOC和DI
来源黑马Spring课程,觉得挺好的
目录
文章目录
- Spring框架学习一---IOC和DI
- 目录
- 学习目标
- 第一章 Spring概述
- 1、为什么要学习spring?
- 2、Spring概述【了解】
- 【1】Spring是什么
- 【2】Spring发展历程
- 【3】Spring优势
- 【4】Spring体系结构
- 3、Spring核心
- 第二章 IOC概念和作用【理解】
- 1、IOC概念
- 【1】控制什么
- 【2】反转什么
- 2、IOC作用
- 【1】IOC作用概述
- 【2】生活中IOC解耦场景描述
- 【3】场景代码(1)
- 【2.1】目标
- 【3.2】实现
- 【3.2.1】创建项目
- 【3.2.2】pojo层
- 【3.2.3】service层
- 【3.2.4】controller层
- 【3.3】场景小结
- 【4】方案一:interface
- 【4.1】思考
- 【4.2】目标
- 【4.3】实现
- 【4.3.1】添加Car接口
- 【4.3.2】实现Car接口
- 【4.3.3】修改CarService
- 【4.4】方案一小结
- 【5】方案二:CarFactroy(2)
- 【5.1】思考
- 【5.2】目标
- 【5.3】实现
- 【5.3.1】创建项目
- 【5.3.2】添加factory层
- 【5.3.3】修改CarService
- 【5.3.4】方案二小结
- 【6】IOC作用小结
- 3、手写IOC实现【理解】
- 【1】思考
- 【2】目标
- 【3】实现(3)
- 【3.1】创建项目
- 【3.2】dao层
- 【3.3】servic层
- 【3.4】factory层
- 【3.5】controller层
- 【4】手写IOC小结
- 第三章 基于xml的spring-IOC【重点】
- 1、【入门案例】xml的spring-IOC(4)
- 【1】思考
- 【2】目标
- 【3】实现
- 【3.1】创建项目
- 【3.2】pom.xml依赖
- 【3.3】spring配置文件bean.xml
- 【3.4】改造AccountService
- 【3.5】改造ClientController
- 【4】入门案例小结
- 第四章 SpringIOC工厂类【了解】
- 1、BeanFactory
- 【1】作用
- 【2】方法
- 2、ApplicationContext
- 【1】作用
- 【2】实现类
- 3、加载顺序
- 【1】思考
- 【2】目的
- 【3】实现(5)
- 【3.1】创建项目
- 【3.3】改造ClientController
- 【4】加载顺序小结
- 第五章 bean标签详解【重点】
- 1、bean标签作用
- 2、bean标签基本属性
- 3、bean标签作用范围
- 【1】思考
- 【2】目标
- 【3】bean作用域实例(6)
- 【3.1】创建项目
- 【3.2】Bean【默认:singleton】
- 【3.3】singleton运行结果
- 【3.4】bean【多例:prototype】
- 【3.5】prototype运行结果
- 【4】bean作用域小结
- 4、bean标签生命周期
- 【1】目标
- 【2】bean生命周期实例(7)
- 【2.1】创建项目
- 【2.3】装配LifecycleBean
- 【2.4】创建ClientController
- 【2.5】单例模式下生命周期:
- 【2.6】多例模式下生命周期
- 【3】bean生命周期小结
- 5、bean的实例化方式(8)
- 【1】目标
- 【2】创建项目
- 【3】缺省构造函数方式【重点】
- 【3.1】配置方式
- 【3.2】注意事项
- 【4】静态工厂方法方式
- 【4.1】配置方式
- 【4.2】静态工厂代码
- 【5】实例工厂方法方式
- 【5.1】配置方式
- 【5.2】实例工厂代码
- 【6】bean实例化小结
- 6、bean标签配置小结
- 第六章 spring的依赖注入(DI)【重点】
- 1、DI是什么?
- 【1】DI概念
- 【2】思考
- 2、依赖注入(DI)的2种方式【重点】
- 【1】set方法注入(9)
- 【1.1】目标
- 【1.2】实现
- 【1.2.1】创建项目
- 【1.2.2】修改AccountServicImpl提供属性的set方法
- 【1.2.3】编写bean.xml
- 【1.2.4】ClientController测试
- 【1.3】set方法注入小结
- 【2】构造函数注入(10)
- 【2.1】目标
- 【2.2】实现
- 【2.1】创建项目
- 【2.2】修改AccountServicImpl添加构造函数
- 【2.3】编写bean.xml
- 【2.4】ClientController测试
- 【2.3】构造函数注入小结
- 3、依赖注入的简单配置【了解】
- 【1】P标签方式(set方法)(11)
- 【1.1】目标
- 【1.2】实现
- 【1.2.1】创建项目
- 【1.2.2】修改bean.xml
- 【1.2.3】ClientController测试
- 【2】C标签方式(构造函数)(12)
- 【2.1】目标
- 【2.2】实现
- 【2.1.1】创建项目
- 【2.1.2】修改bean.xml
- 【2.1.3】ClientController测试
- 【3】简单配置小结
- 4、复杂类型的注入(13)【了解】
- 【1】目标
- 【2】实现
- 【2.1】创建项目
- 【2.2】创建Account
- 【2.3】编写bean.xml
- 【2.4】controller测试
- 【3】复杂对象注入小结
学习目标
1、了解Spring框架;
2、了解Spring框架的两大核心;
3、理解IOC的概念;
4、掌握Spring基于xml的IOC配置;
5、了解Spring中的工厂结构;
6、掌握Spring的bean标签的配置;
7、掌握spring的di注入机制
第一章 Spring概述
1、为什么要学习spring?
如果让本人用一句话去回答这个问题,那么我只能说:在J2EE的学习之路上,spring给我带来了开发的春天,让我们从JSP、sevlet的高耦合的开发中彻底的解救出来。
-
spring是目前最主流的框架
-
spring是学习后面课程(比如:springboot、springcloud等)的基础
2、Spring概述【了解】
【1】Spring是什么
Spring是一个开源框架,Spring的核心是控制反转(IoC)和面向切面(AOP)。简单来说,Spring是一个分层的JavaSE/EE full-stack(一站式) 轻量级开源框架。
轻量级:与EJB对比,依赖资源少,销毁的资源少。
分层: 一站式,每一个层都提供的解决方案
-
web层:struts2,spring-MVC
-
service层:spring
-
dao层:hibernate,mybatis , jdbcTemplate --> spring-data
【2】Spring发展历程
Spring的发展历史:
1997年IBM提出了EJB的思想
1998年,SUN制定开发标准规范EJB1.0
1999年,EJB1.1发布
2001年,EJB2.0发布
2003年,EJB2.1发布
2006年,EJB3.0发布
Rod Johnson(spring之父)
Expert One-to-One J2EE Design and Development(2002)
阐述了J2EE使用EJB开发设计的优点及解决方案
Expert One-to-One J2EE Development without EJB(2004)
阐述了J2EE开发不使用EJB的解决方式(Spring雏形)
2017年9月份发布了spring的最新版本–spring 5.0通用版(GA)
【3】Spring优势
Spring 出现是为了解决JavaEE 实际问题:
-
方便解耦,简化开发 (IOC)
Spring就是一个大工厂(容器),可以将所有对象创建和依赖关系维护,交给Spring管理
Spring工厂是用于生成bean
-
AOP编程的支持
Spring提供面向切面编程,可以方便的实现对程序进行权限拦截、运行监控等功能
-
声明式事务的支持
只需要通过配置就可以完成对事务的管理,而无需手动编程
-
方便程序的测试
Spring对Junit4支持,可以通过注解方便的测试Spring程序
-
方便集成各种优秀框架
Spring不排斥各种优秀的开源框架,其内部提供了对各种优秀框架(如:Struts、Hibernate、MyBatis、Quartz等)的直接支持
-
降低JavaEE API的使用难度
Spring 对JavaEE开发中非常难用的一些API(JDBC、JavaMail、远程调用等),都提供了封装,使这些API应用难度大大降低
基于这些特性,我们也会俗称Spring为开发架构的粘合剂。
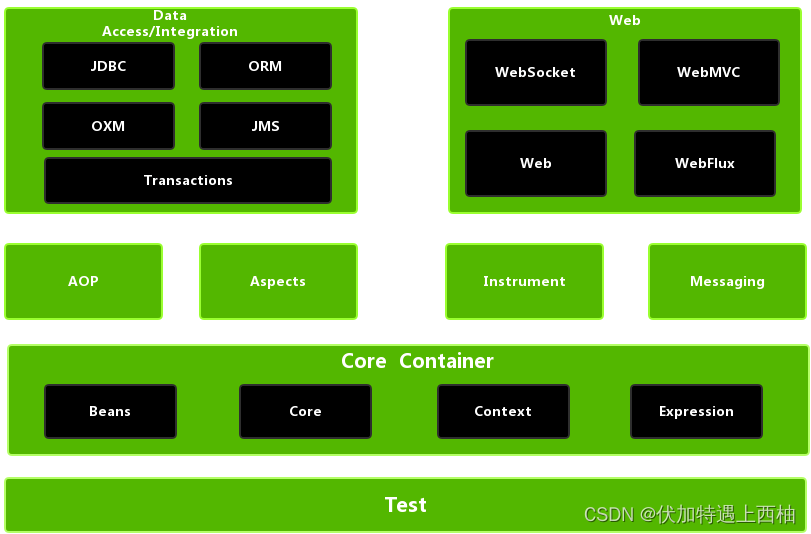
【4】Spring体系结构
官网:https://spring.io/
Spring框架至今已集成了20多个模块,这些模块分布在以下模块中:
核心容器(Core Container)
数据访问/集成(Data Access/Integration)层
Web层
AOP(Aspect Oriented Programming)模块
植入(Instrumentation)模块
消息传输(Messaging)
测试(Test)模块
3、Spring核心
Spring为企业级开发提供了丰富的功能,这些功能的底层都依赖于它的两个核心特性:
-
控制反转(Inversion of Control,IOC)
-
面向切面编程(aspect-oriented programming,AOP)
IOC和AOP是一种技术吗?不!他们是一种思想
第二章 IOC概念和作用【理解】
1、IOC概念
IoC 全称为 Inversion of Control,翻译为 “控制反转”。
【1】控制什么
控制对象的创建和销毁
【2】反转什么
将对象的控制权(创建和销毁)交给IOC容器
2、IOC作用
【1】IOC作用概述
IOC的作用:解耦
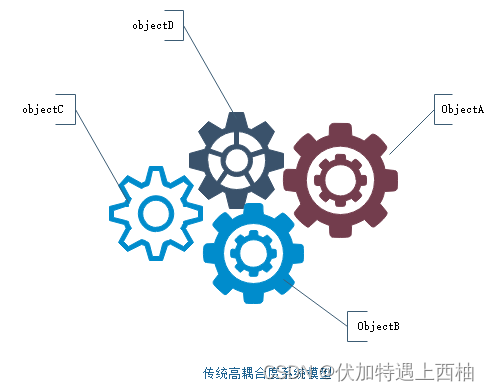
我们知道在面向对象设计的软件系统中,它的底层都是由N个对象构成的,各个对象之间通过相互合作,最终实现系统地业务逻辑 ,如图所示:
IOC理论提出的观点:借助于“第三方”实现具有依赖关系的对象之间的解耦。 如图所示:
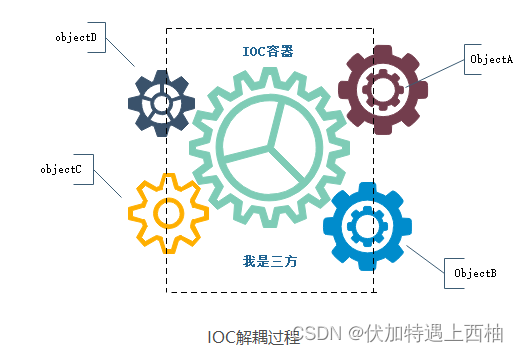
大家看到了吧,由于引进了中间位置的“第三方”,也就是IOC容器,使得A、B、C、D这4个对象没有了耦合关系,齿轮之间的传动全部依靠“第三方”了,全部对象的控制权全部上缴给“第三方”IOC容器,所以,IOC容器成了整个系统的关键核心,它起到了一种类似“粘合剂”的作用,把系统中的所有对象粘合在一起发挥作用,如果没有这个“粘合剂”,对象与对象之间会彼此失去联系,这就是有人把IOC容器比喻成“粘合剂”的由来。
我们再来做个试验:把上图中间的IOC容器隐藏,然后再来看看这套系统
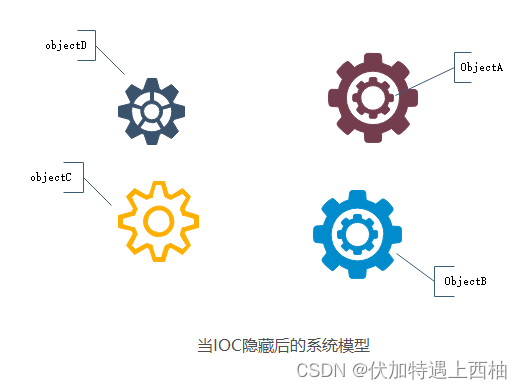
我们现在看到的画面,就是我们要实现整个系统所需要完成的全部内容。这时候,A、B、C、D这4个对象之间已经没有了耦合关系,彼此毫无联系,这样的话,当你在实现A的时候,根本无须再去考虑B、C和D了,对象之间的依赖关系已经降低到了最低程度。
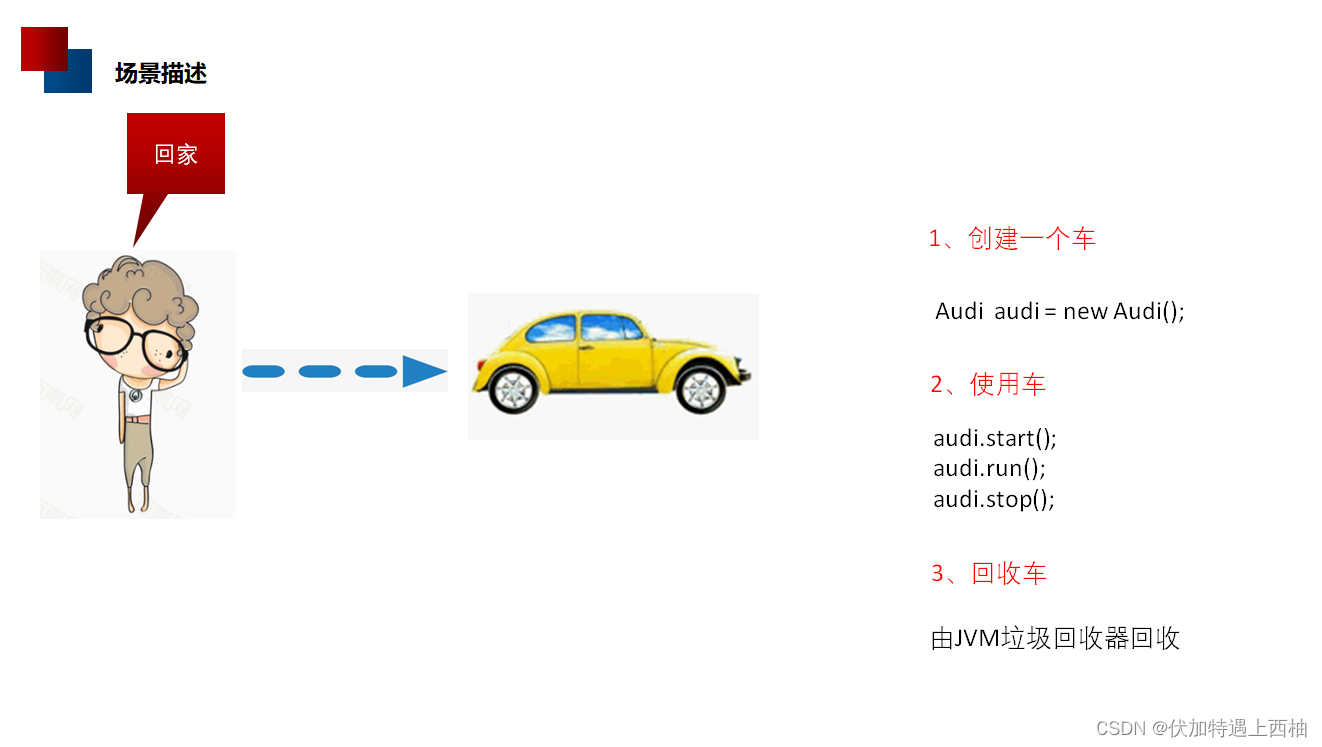
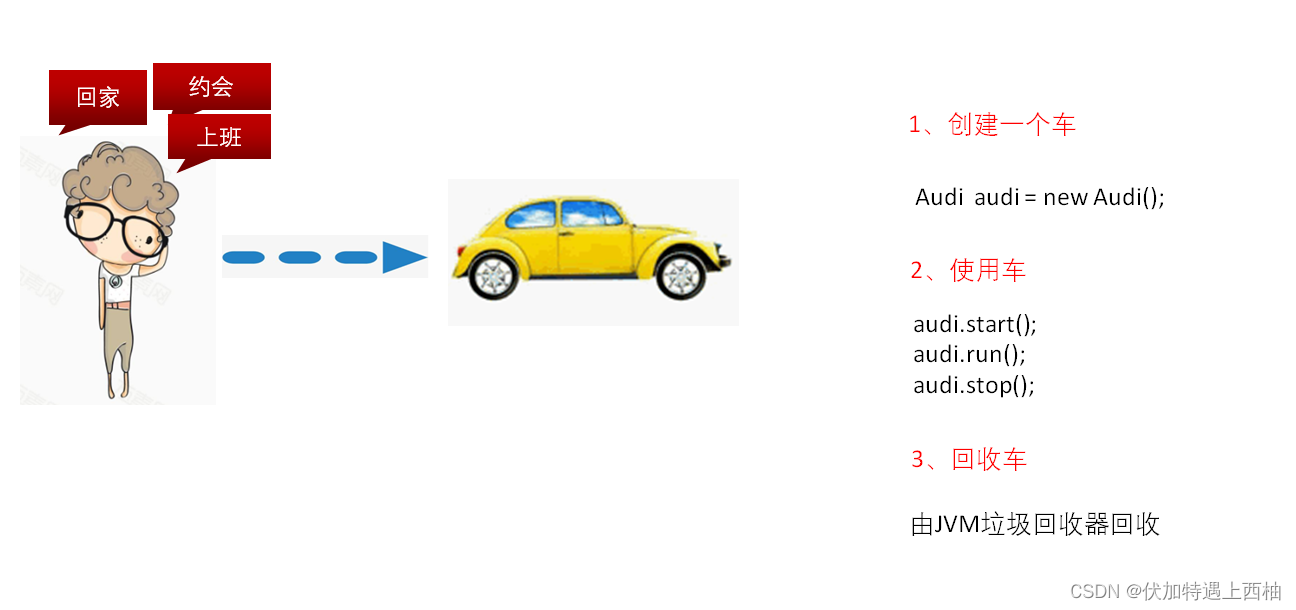
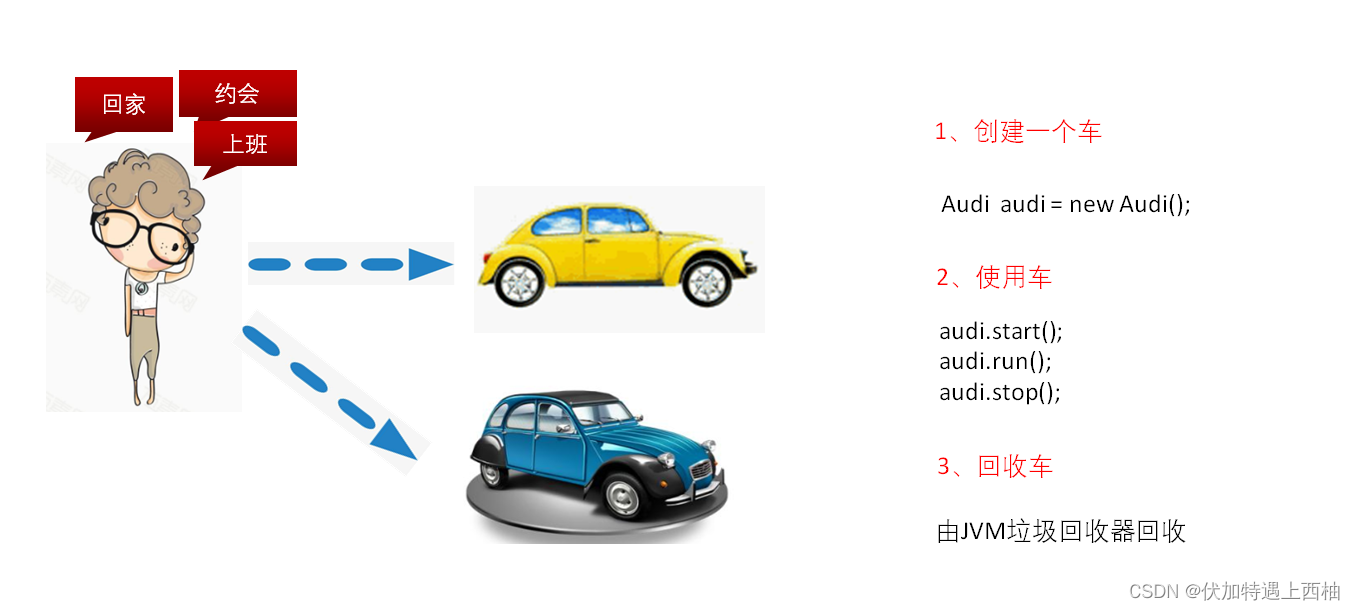
【2】生活中IOC解耦场景描述
回家场景代码描述
1、创建一个车
2、使用车
3、回收车
【3】场景代码(1)
【2.1】目标
1、用代码描述用车场景
2、分析依赖的问题
【3.2】实现
#步骤:【1】创建pojo、service.controller层【2】创建基础类:AUdi;CarService;XiaoWang【3】使用CarService调用Audi
【3.2.1】创建项目
新建spring-day01-01car结构如下
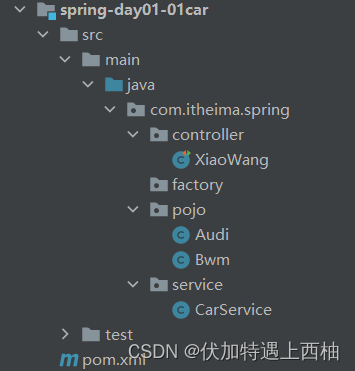
【3.2.2】pojo层
package com.itheima.spring.pojo;/*** @Description:奥迪车*/
public class Audi {/*** @Description 启动*/public void start(){System.out.println("奥迪启动。。。。");}/*** @Description 运行*/public void run(){System.out.println("奥迪运行。。。。");}/*** @Description 停止*/public void stop(){System.out.println("奥迪熄火。。。。");}
}
package com.itheima.spring.pojo;/*** @Description:宝马车*/
public class Bmw {public void start(){System.out.println("宝马启动");}public void run(){System.out.println("驾驶宝马");}public void stop(){System.out.println("宝马熄火");}
}
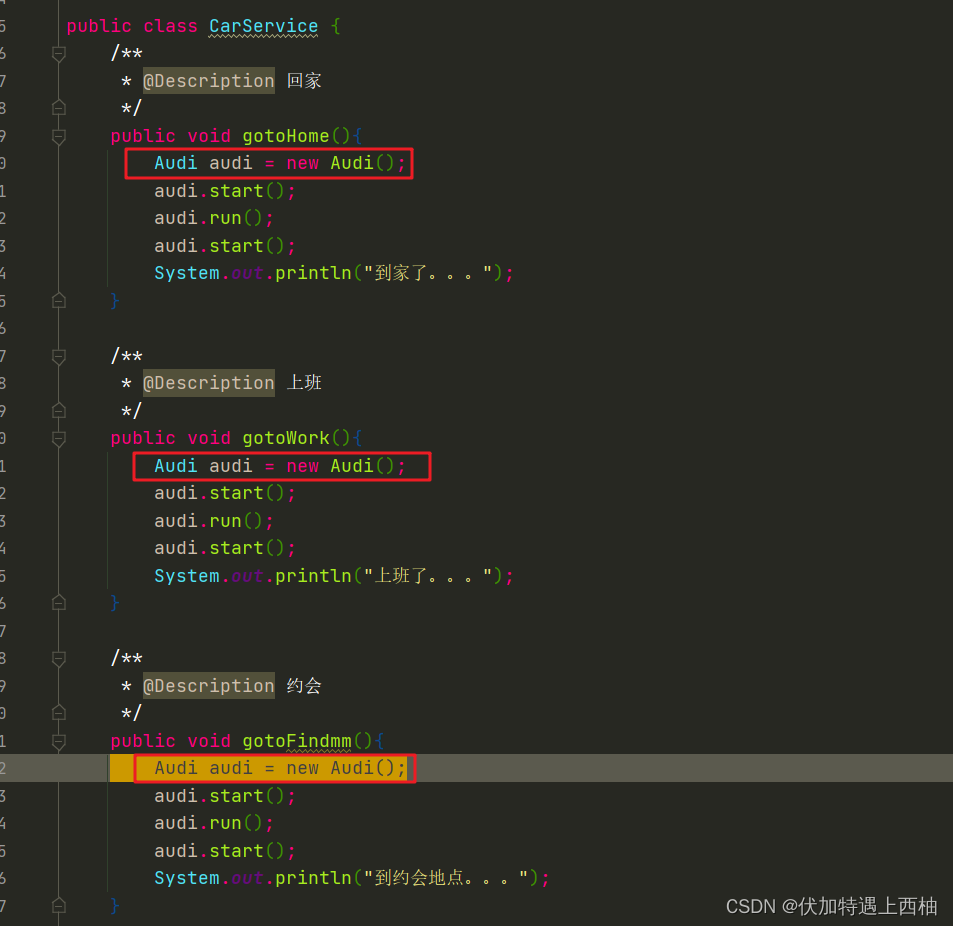
【3.2.3】service层
package com.itheima.spring.service;import com.itheima.spring.pojo.Audi;/*** @Description:车辆使用场景*/
public class CarService {/*** @Description 回家*/public void gotoHome(){Audi audi = new Audi();audi.start();audi.run();audi.start();System.out.println("到家了。。。");}/*** @Description 上班*/public void gotoWork(){Audi audi = new Audi();audi.start();audi.run();audi.start();System.out.println("到家了。。。");}/*** @Description 约会*/public void gotoFindmm(){Audi audi = new Audi();audi.start();audi.run();audi.start();System.out.println("到约会地点。。。");}
}
【3.2.4】controller层
package com.itheima.spring.controller;import com.itheima.spring.service.CarService;
import org.junit.jupiter.api.Test;/*** @Description:小王的生活场景*/
public class XiaoWang {@Testpublic void needGotoHome(){CarService carService = new CarService();carService.gotoHome();}@Testpublic void needGotoWork(){CarService carService = new CarService();carService.gotoWork();}@Testpublic void needGotoFindMM(){CarService carService = new CarService();carService.gotoFindMM();}
}
【3.3】场景小结
1、回家、上班、约会多个场景小王都需要依赖车
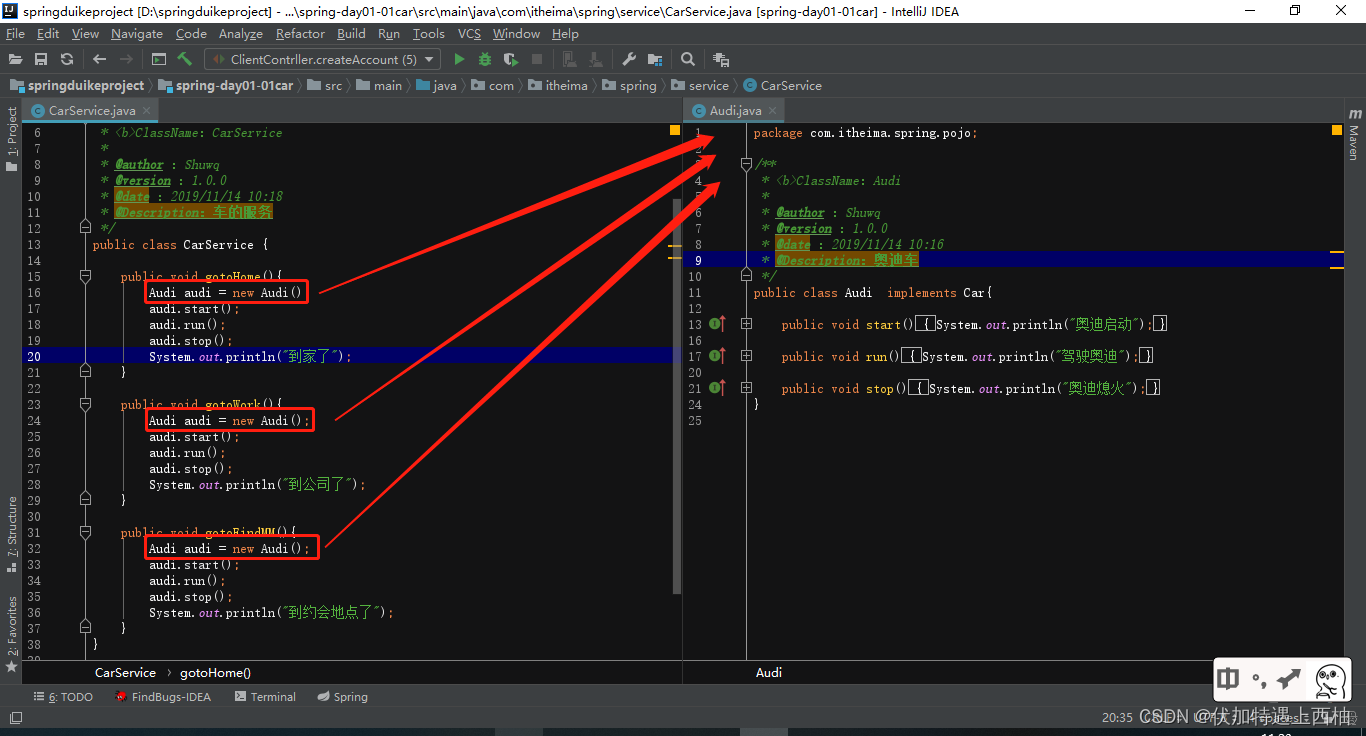
2、换车之后都要修改CarService的业务代码
【4】方案一:interface
【4.1】思考
1、咱们想一下,小王是需要一辆宝马?需要一辆奥迪?其实小王只是需要一辆车?同学们之前我们是不是学习过接口的概念,这里我们能不能抽象出一个Car的接口呢?
【4.2】目标
1、使用接口与实现分离的方式解耦
【4.3】实现
#步骤:【1】添加Car的接口【2】Audi、Bmw实现Car接口【3】修改CarService
【4.3.1】添加Car接口
package com.itheima.spring.pojo;/*** @Description:车接口*/
public interface Car {public void start();public void run();public void stop();
}
【4.3.2】实现Car接口
package com.itheima.spring.pojo;/*** @Description:奥迪*/
public class Audi implements Car{public void start(){System.out.println("奥迪启动");}public void run(){System.out.println("驾驶奥迪");}public void stop(){System.out.println("奥迪熄火");}
}
package com.itheima.spring.pojo;/*** @Description:宝马*/
public class Bmw implements Car {public void start(){System.out.println("宝马启动");}public void run(){System.out.println("驾驶宝马");}public void stop(){System.out.println("宝马熄火");}
}【4.3.3】修改CarService
package com.itheima.spring.service;import com.itheima.spring.pojo.Audi;
import com.itheima.spring.pojo.Car;/*** @Description:车辆使用场景*/
public class CarService {Car audi = new Audi();/*** @Description 回家*/public void gotoHome(){
//        Audi audi = new Audi();audi.start();audi.run();audi.start();System.out.println("到家了。。。");}/*** @Description 上班*/public void gotoWork(){
//        Audi audi = new Audi();audi.start();audi.run();audi.start();System.out.println("到家了。。。");}/*** @Description 约会*/public void gotoFindmm(){
//        Audi audi = new Audi();audi.start();audi.run();audi.start();System.out.println("到约会地点。。。");}
}
【4.4】方案一小结
1、局部变量提到成员变量解耦
2、接口与实现分离解耦
3、Car bmw = new Bmw();的时候还是需要指定实现类,由此可以看出,没有本质上解决强依赖的问题
#【话外音】#难道上班、约会、回家之前小王自己造个车吗?
【5】方案二:CarFactroy(2)
【5.1】思考
现实生活中,我们不可能在上班、回家、约会之前自己去造车子,而是我们在使用车子之前,去工厂买一辆,
车的制造是由汽车工厂完成,我们只需要告诉工厂咱们需要什么牌子的车就好
【5.2】目标
1、用代码模拟汽车工厂
2、理解IOC控制反转的概念
【5.3】实现
#步骤【1】增加汽车工厂工厂提供车的方式:可以直接调用的生产车过程:知道类全路径,使用反射机制实例化类的对象【2】修改CarService,使用工厂
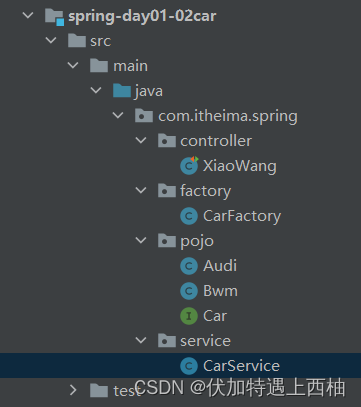
【5.3.1】创建项目
拷贝项目spring-day01-01car建立spring-day01-02car结构如下:
【5.3.2】添加factory层
package com.itheima.spring.factory;import com.itheima.spring.pojo.Car;/*** @Description:汽车工厂*/
public class CarFactory{/*** @Description 根据class对象实例化车* @param carClass 车辆class对象* @return*/public static Car getCar(Class<?> carClass){String carClassName = carClass.getName();Car car =null;try {car = (Car) Class.forName(carClassName).newInstance();} catch (InstantiationException e) {e.printStackTrace();} catch (IllegalAccessException e) {e.printStackTrace();} catch (ClassNotFoundException e) {e.printStackTrace();}return car;}/*** @Description 根据class对象实例化车* @param carClassName 车辆class对象全限定名称* @return*/public static Car getCar(String carClassName ){Car car =null;try {car = (Car) Class.forName(carClassName).newInstance();} catch (InstantiationException e) {e.printStackTrace();} catch (IllegalAccessException e) {e.printStackTrace();} catch (ClassNotFoundException e) {e.printStackTrace();}return car;}
}
【5.3.3】修改CarService
/*** @Description:车辆使用场景*/
public class CarService {Car audi = CarFactory.getCar(Audi.class);/*** @Description 回家*/public void gotoHome(){
//        Audi audi = new Audi();audi.start();audi.run();audi.start();System.out.println("到家了。。。");}/*** @Description 上班*/public void gotoWork(){
//        Audi audi = new Audi();audi.start();audi.run();audi.start();System.out.println("到公司。。。");}/*** @Description 约会*/public void gotoFindmm(){
//        Audi audi = new Audi();audi.start();audi.run();audi.start();System.out.println("到约会地点。。。");}
}
【5.3.4】方案二小结
1、程序中汽车工厂生产车的方式:反射实例化汽车对象
2、程序中汽车工厂--IOC容器
【6】IOC作用小结
IOC-控制反转:控制什么:控制对象的创建和销毁;反转什么:new-->factory创建;
IOC的作用:解耦
IOC是什么:工厂: 反射机制实例化对象
3、手写IOC实现【理解】
咱们完成了一个生活中的场景解耦描述,知道了:
- IOC就是一个工厂
【1】思考
1、手写IOC工厂采用什么方式实例化对象?方案:反射机制实例化类的对象2、能不能把实例化的对象,事先加载到集合中?选取什么数据结构的集合合适?方案:对象名和对象全限定名是键值对结构,又需要便于存储与查找,使用map集合更适合!3、类似“com.itheima.spring.pojo.Audi”的配置信息怎么处理?方案:放到properties文件
【2】目标
1、手写IOC反射机制实例化对象存储到集合容器使用properties文件存储配置
【3】实现(3)
1、创建项目及J2EE三层架构
2、创建pojo对象
3、创建dao对象
4、创建service对象
5、创建controller对象
6、创建properties文件
7、factory工厂类【重点】【1】事先创建集合容器【2】事先加载properties文件内容【3】反射机制实例化bean对象,并且放入集合容器【4】公共的访问方法
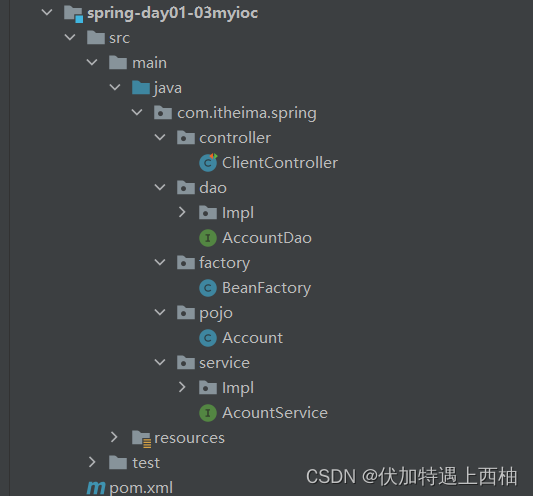
【3.1】创建项目
新建项目spring-day01-03myioc结构如下
package com.heima.spring.pojo;/*** @Description:账户实体类*/
public class Account {//账户编号private String Id;//账户所有者private String accountName;//账户余额private Float money;public Account() {}public String getId() {return Id;}public void setId(String id) {Id = id;}public String getAccountName() {return accountName;}public void setAccountName(String accountName) {this.accountName = accountName;}public Float getMoney() {return money;}public void setMoney(Float money) {this.money = money;}@Overridepublic String toString() {return "Account{" +"Id='" + Id + '\'' +", accountName='" + accountName + '\'' +", money=" + money +'}';}
}
【3.2】dao层
package com.itheima.spring.dao;/*** @Description:账户dao层*/
public interface AccountDao {/*** @Description 新增*/void saveAccount();/*** @Description 删除*/void delAccount();/*** @Description 修改*/void updateAccout();/*** @Description 查询*/void findAccount();}
package com.itheima.spring.dao.impl;import com.itheima.spring.dao.AccountDao;
import com.itheima.spring.pojo.Account;/*** @Description:*/
public class AccountDaoImpl implements AccountDao {private static Account account;static {account = new Account();account.setId("010101");account.setAccountName("张三");account.setMoney(2000F);}@Overridepublic void saveAccount() {System.out.println("保存:"+account.toString());}@Overridepublic void delAccount() {System.out.println("删除:"+account.toString());}@Overridepublic void updateAccout() {System.out.println("修改:"+account.toString());}@Overridepublic void findAccount() {System.out.println("查询:"+account.toString());}
}【3.3】servic层
package com.itheima.spring.service;import com.itheima.spring.dao.AccountDao;/*** @Description:用户业务层接口*/
public interface AccountService {/*** @Description 新增*/void saveAccount();/*** @Description 删除*/void delAccount();/*** @Description 修改*/void updateAccout();/*** @Description 查询*/void findAccount();void setAccountDao(AccountDao accountDao);
}
package com.itheima.spring.service.impl;import com.itheima.spring.dao.AccountDao;
import com.itheima.spring.service.AccountService;/*** @Description:用户业务层接口实现*/
public class AccountServiceImpl implements AccountService {private AccountDao accountDao;@Overridepublic void saveAccount() {accountDao.saveAccount();}@Overridepublic void delAccount() {accountDao.delAccount();}@Overridepublic void updateAccout() {accountDao.updateAccout();}@Overridepublic void findAccount() {accountDao.findAccount();}@Overridepublic void setAccountDao(AccountDao accountDao) {this.accountDao = accountDao;}
}【3.4】factory层
在resources目录中建立
db.properties
accountDao = com.itheima.spring.dao.impl.AccountDaoImpl
accountService = com.itheima.spring.service.impl.AccountServiceImpl
package com.itheima.spring.factory;import javafx.beans.binding.ObjectExpression;import java.io.IOException;
import java.util.*;/*** @Description:bean工厂*/
public class BeanFactory {//1、事先存储容器private static Map<String, Object> map = new HashMap<>();//2、加载配置文件static {Properties properties = new Properties();try {properties.load(BeanFactory.class.getClassLoader().getResourceAsStream("db.properties"));Enumeration<?> enumeration = properties.propertyNames();while (enumeration.hasMoreElements()) {String key = (String) enumeration.nextElement();String value = (String) properties.get(key);//3、实例化beanObject beanObject = Class.forName(value).newInstance();//4、放入容器map.put(key,beanObject);}} catch (IOException e) {e.printStackTrace();} catch (IllegalAccessException e) {e.printStackTrace();} catch (InstantiationException e) {e.printStackTrace();} catch (ClassNotFoundException e) {e.printStackTrace();}}//5、公共获得beanpublic static Object getBean(String calssName){return map.get(calssName);}
}
【3.5】controller层
package com.itheima.spring.controller;import com.itheima.spring.dao.AccountDao;
import com.itheima.spring.factory.BeanFactory;
import com.itheima.spring.service.AccountService;
import com.itheima.spring.service.Impl.AccountServiceImpl;
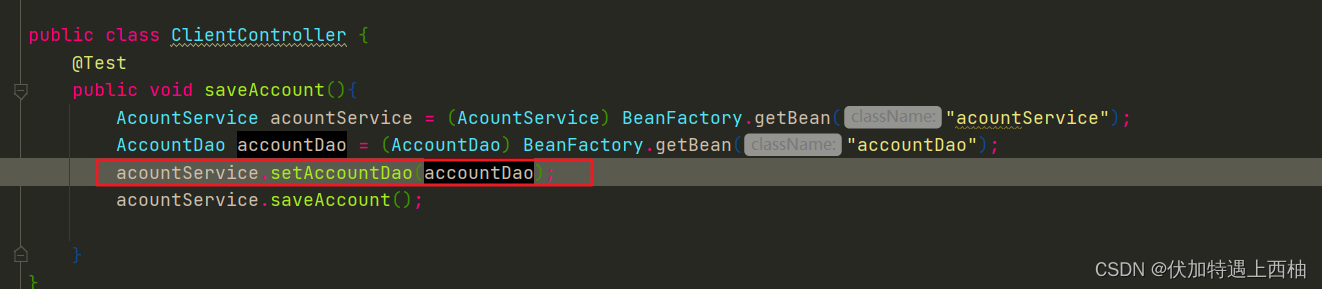
import org.junit.Test;/*** @Description:*/
public class ClientController {@Testpublic void saveAccount() {AccountService accountService = (AccountService) BeanFactory.getBean("accountService");accountService.setAccountDao((AccountDao) BeanFactory.getBean("accountDao"));accountService.saveAccount();}}
【4】手写IOC小结
我们通过使用工厂模式,实现了表现层——业务层、业务层——持久层的解耦。 【实现思路】:工厂+反射+配置文件【核心思想】:【1】读取配置文件中类的全限定名通过反射机制创建对象。 【2】把创建出来的对象事先都存起来,当我们使用时可以直接从存储容器中获取。 存哪去? 由于我们是很多对象,肯定要找个集合来存。这时候有 Map 和 List 供选择。 到底选 Map 还是 List 就看我们有没有查找需求。有查找需求,选 Map。 所以我们的答案就是在应用加载时,创建一个 Map,用于存放bean对象。我们把这个 map 称之为容器。 什么是IOC工厂 事先加载bean,并且提供一个直接获取bean的方法。什么是控制反转 主动new对象方式--被动从容器中获取
第三章 基于xml的spring-IOC【重点】
1、【入门案例】xml的spring-IOC(4)
【1】思考
1、我们采用工厂+反射的方式实现了手写IOC工厂,那么spring-IOC的工厂是不是也类似?spring框架提供了一个大工厂接口:ApplicationContext==》Beanfactroy2、手写IOC中的配置文件类型是properties,那么spring-IOC的配置采取的是什么类型?spring使用XML格式的文件存储配置<bean id="唯一标识" class="实现类的全限定名"></bean>3、spring-IOC是怎么加载配置文件的呢?ApplicationContext工厂使用ClassPathXmlApplicationContext加载配置文件4、手写IOC中的BeanFactory提供一个公共获得bean的方法,那spring-ioc是不是有类似的方法?ApplicationContext工厂使用getBean()方法,用于根据bean的名称获取实例化对象【2】目标
1、掌握spring-IOC工厂的创建
2、掌握bean标签的基本配置
3、掌握spring-IOC工厂获得实例化对象的方式
【3】实现
步骤:1、导入依赖2、编写bean.xml文件替换properties3、使用ClassPathXmlApplicationContext加载bean.xml配置文件4、使用ApplicationContext工厂的getBean()方法获得bean
【3.1】创建项目
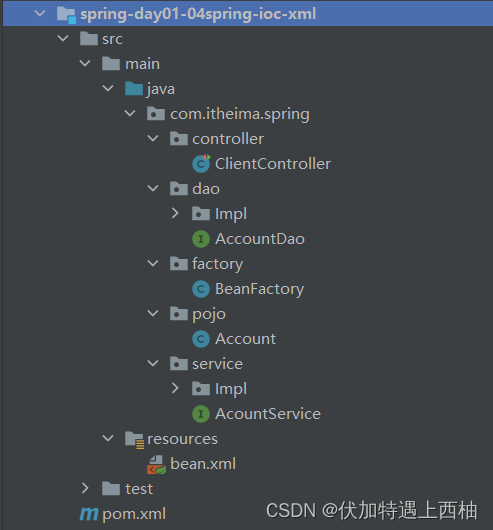
创建spring-day01-04spring-ioc-xml结构如下
【3.2】pom.xml依赖
<?xml version="1.0" encoding="UTF-8"?><project xmlns="http://maven.apache.org/POM/4.0.0" xmlns:xsi="http://www.w3.org/2001/XMLSchema-instance"xsi:schemaLocation="http://maven.apache.org/POM/4.0.0 http://maven.apache.org/xsd/maven-4.0.0.xsd"><modelVersion>4.0.0</modelVersion><groupId>com.itheima.spring</groupId><artifactId>spring-day01-04spring-ioc-xml</artifactId><version>1.0-SNAPSHOT</version><name>spring-day01-04spring-ioc-xml</name><!-- FIXME change it to the project's website --><url>http://www.example.com</url><properties><project.build.sourceEncoding>UTF-8</project.build.sourceEncoding><!-- spring版本 --><spring.version>5.1.11.RELEASE</spring.version></properties><dependencies><dependency><groupId>junit</groupId><artifactId>junit</artifactId><version>4.11</version></dependency><dependency><groupId>org.springframework</groupId><artifactId>spring-context</artifactId><version>${spring.version}</version></dependency></dependencies><build></build>
</project>
【3.3】spring配置文件bean.xml
[外链图片转存失败,源站可能有防盗链机制,建议将图片保存下来直接上传(img-Wf1Eggxg-1679275066825)(img\image-20191104144000328.png)]
初建时候bean.xml的结构如下
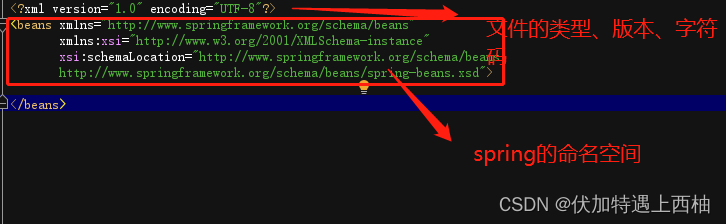
<?xml version="1.0" encoding="UTF-8"?>
<beans xmlns="http://www.springframework.org/schema/beans"xmlns:xsi="http://www.w3.org/2001/XMLSchema-instance"xsi:schemaLocation="http://www.springframework.org/schema/beanshttp://www.springframework.org/schema/beans/spring-beans.xsd"></beans>
全部改写完成后bean.xml的配置
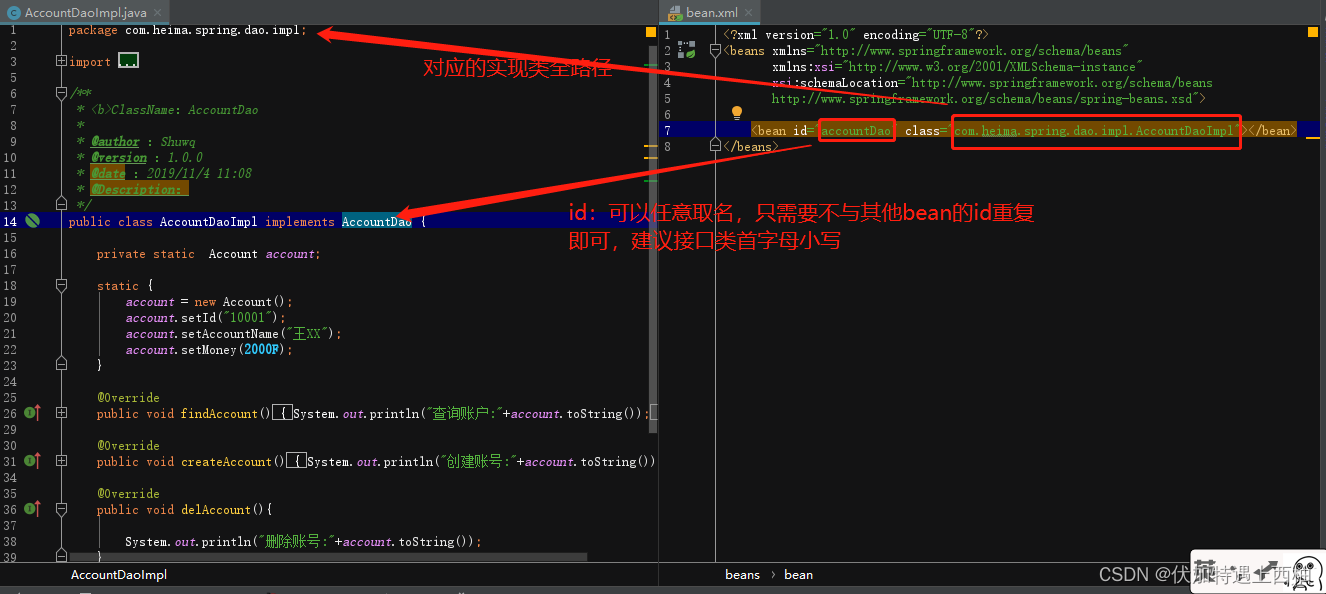
<?xml version="1.0" encoding="UTF-8"?>
<beans xmlns="http://www.springframework.org/schema/beans"xmlns:xsi="http://www.w3.org/2001/XMLSchema-instance"xsi:schemaLocation="http://www.springframework.org/schema/beans http://www.springframework.org/schema/beans/spring-beans.xsd"><!--bean作用:声明类交给spring容器属性:id: 唯一标识class:全路径限定名称细节:默认使用无参构造函数实例化--><bean id="accountDao" class="com.itheima.spring.dao.Impl.AccountDaoImpl"></bean><bean id="acountService" class="com.itheima.spring.service.Impl.AcountServiceImpl"></bean>
</beans>
【3.4】改造AccountService
package com.itheima.spring.service;import com.itheima.spring.dao.AccountDao;public interface AcountService {/*** @Description 新增*/void saveAccount();/*** @Description 删除*/void delAccount();/*** @Description 修改*/void updateAccout();/*** @Description 查询*/void findAccount();void setAccountDao(AccountDao accountDao);
}
import com.itheima.spring.dao.AccountDao;
import com.itheima.spring.service.AcountService;public class AcountServiceImpl implements AcountService {private AccountDao accountDao;@Overridepublic void saveAccount() {accountDao.saveAccount();}@Overridepublic void delAccount() {accountDao.delAccount();}@Overridepublic void updateAccout() {accountDao.updateAccout();}@Overridepublic void findAccount() {accountDao.findAccount();}@Overridepublic void setAccountDao(AccountDao accountDao) {this.accountDao = accountDao;}
}【3.5】改造ClientController
public class ClientController {@Testpublic void saveAccount(){/*1、导入依赖2、编写bean.xml文件替换properties3、使用ClassPathXmlApplicationContext加载bean.xml配置文件4、使用ApplicationContext工厂的getBean()方法获得bean*/ApplicationContext applicationContext=new ClassPathXmlApplicationContext("bean.xml");AcountService acountService = (AcountService) applicationContext.getBean("acountService");AccountDao accountDao = applicationContext.getBean("accountDao",AccountDao.class);acountService.setAccountDao(accountDao);acountService.saveAccount();}
}
【4】入门案例小结
spring-IOC入门案例,我们了解如下内容:1、工厂类:ApplicationContext2、工厂配置:文件类型:xml方式:<!--配置accountDao、accountServic说明:标签:bean:配置javaBean对象属性:id:bean的唯一标识名称class:类的全路径信息细节:默认使用无参数构造方法,创建对象--><bean id="accountDao" class="com.heima.spring.dao.impl.AccountDaoImpl"></bean>3、工厂加载配置:ApplicationContext通过ClassPathXmlApplicationContext加载bean.xml配置4、工厂获得bean:ApplicationContext使用getBean()方法,用于根据bean的名称获取实例化对象
第四章 SpringIOC工厂类【了解】
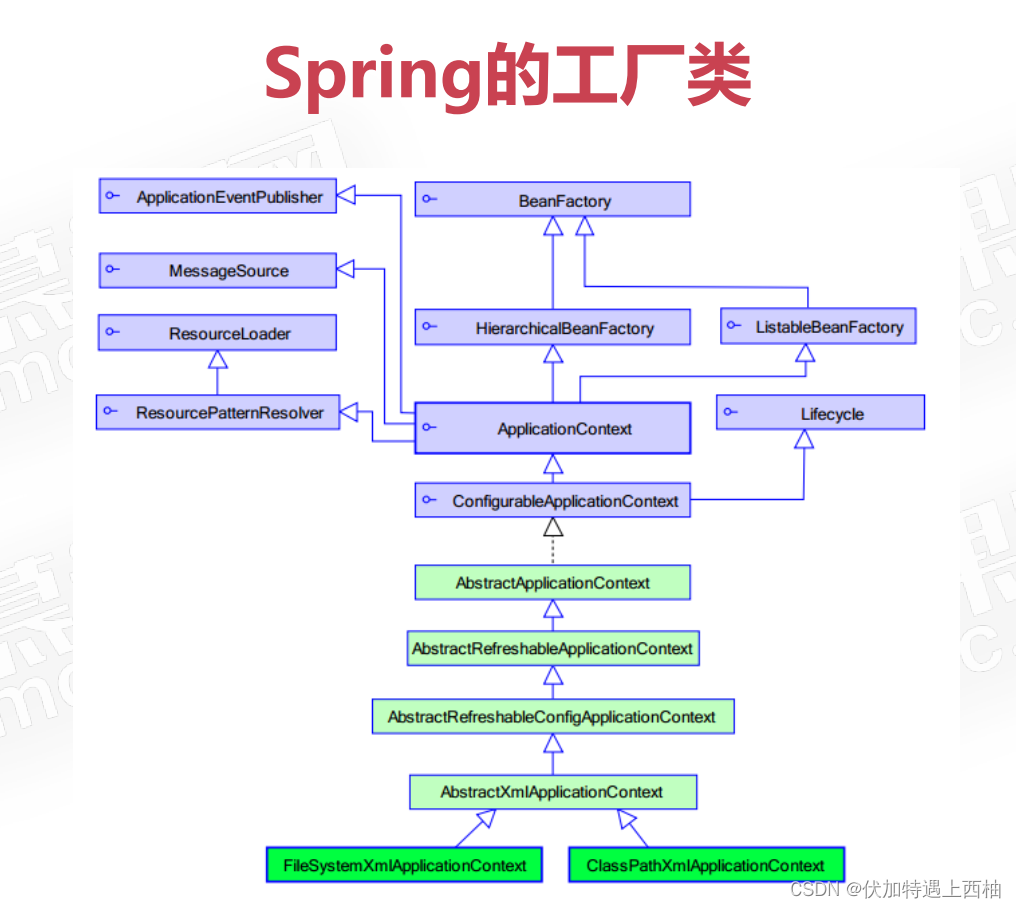
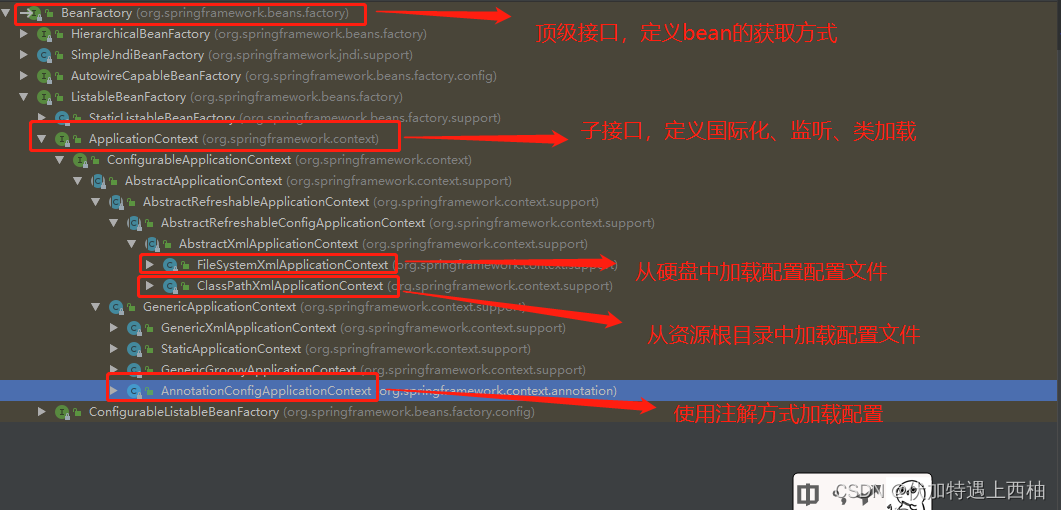
1、BeanFactory
【1】作用
Spring里面最顶层的接口,提供了最简单的容器的功能,只定义了实例化对象和拿对象的功能;
【2】方法
public interface BeanFactory {//对FactoryBean的转义定义,因为如果使用bean的名字检索FactoryBean得到的对象是工厂生成的对象String FACTORY_BEAN_PREFIX = "&";//根据bean的名字,在IOC容器中得到bean实例,*Object getBean(String name) throws BeansException;//根据bean的名字,在IOC容器中得到bean实例,args:显式参数(必须为非单例模式)Object getBean(String name, Object... args) throws BeansException;//根据bean的名字获得对象,并转换为Class类型*<T> T getBean(String name, Class<T> requiredType);//根据bean的类型获得对象(必须是拥有唯一实现类)*<T> T getBean(Class<T> requiredType) throws BeansException;//根据bean的类型获得对象,args:显式参数<T> T getBean(Class<T> requiredType, Object... args) throws BeansException;//这里提供对bean的检索,看看是否在IOC容器有这个名字的bean*boolean containsBean(String name);//判断这个bean是不是单例 *boolean isSingleton(String name) throws NoSuchBeanDefinitionException;//同时判断这个bean是不是多例 *boolean isPrototype(String name) throws NoSuchBeanDefinitionException;//这里得到bean实例的Class类型 *Class<?> getType(String name) throws NoSuchBeanDefinitionException;//这里得到bean的别名,如果根据别名检索,那么其原名也会被检索出来 *String[] getAliases(String name);
2、ApplicationContext
【1】作用
应用上下文,继承BeanFactory接口,它是Spring的更高级的容器,提供了更多的有用的功能;
-
国际化(MessageSource)
-
访问资源,如URL和文件(ResourceLoader)
-
载入多个(有继承关系)上下文 ,使得每一个上下文都专注于一个特定的层次,比如应用的web层
-
消息发送、响应机制(ApplicationEventPublisher)
-
AOP(拦截器)
【2】实现类
ClassPathXmlApplicationContext:
从类的根路径下加载配置文件 推荐使用这种
FileSystemXmlApplicationContext
从硬盘路径下加载配置文件
AnnotationConfigApplicationContext
基于Java的配置类加载Spring的应用上下文配置
@Testpublic void createAccountTest(){//加载配置文件ApplicationContext applicationContext = new ClassPathXmlApplicationContext("classpath:bean.xml");//获得beanAccountDao accountDao = (AccountDao) applicationContext.getBean("accountDao");AccountServic accountServic = (AccountServic) applicationContext.getBean("accountServic");//set方法指定accountDaoaccountServic.setAccountDao(accountDao);//创建账户accountServic.createAccount();}
3、加载顺序
【1】思考
BeanFactory、ApplicationContext都是容器,那么他们的加载顺序有什么不同?
【2】目的
了解BeanFactory和ApplicationContext的加载顺序
【3】实现(5)
步骤:1、观察ApplicationContext的加载方式2、观察BeanFactory的加载方式3、比较一下加载顺序
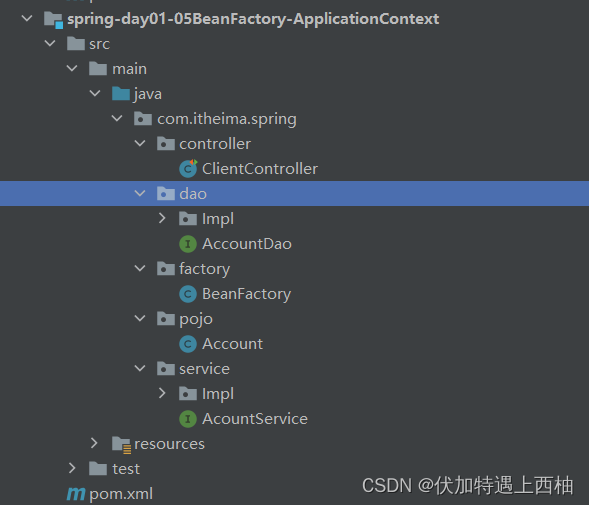
【3.1】创建项目
拷贝项目spring-day01-04spring-ioc-xml创建spring-day01-05BeanFactory-ApplicationContext结构如下
在AccountDaoImpl中增加构造函数
public AccountDaoImpl() {System.out.println("AccountDaoImpl的实例已经创建");
}
【3.3】改造ClientController
package com.itheima.spring.controller;import com.itheima.spring.dao.AccountDao;
import com.itheima.spring.service.AccountService;
import org.junit.Test;
import org.springframework.beans.factory.BeanFactory;
import org.springframework.beans.factory.xml.XmlBeanFactory;
import org.springframework.context.ApplicationContext;
import org.springframework.context.support.ClassPathXmlApplicationContext;
import org.springframework.core.io.ClassPathResource;
import org.springframework.core.io.Resource;/*** @Description:测试*/
public class ClientController {@Testpublic void saveAccount() {/*** Spring-IOC容器:ApplicationContext* 构建方式:通过ClassPathXmlApplicationContext加载配置文件* 使用bean:getBean*/System.out.println("======ApplicationContext开始创建容器=====");ApplicationContext applicationContext = new ClassPathXmlApplicationContext("bean.xml");System.out.println("======ApplicationContext创建容器完成=====");applicationContext.getBean("accountDao");System.out.println("======分割线==========");System.out.println("======BeanFactory开始创建容器=====");Resource resource = new ClassPathResource("bean.xml");BeanFactory beanFactory = new XmlBeanFactory(resource);System.out.println("======BeanFactory创建容器完成=====");beanFactory.getBean("accountDao");}}
【3.4】加载顺序
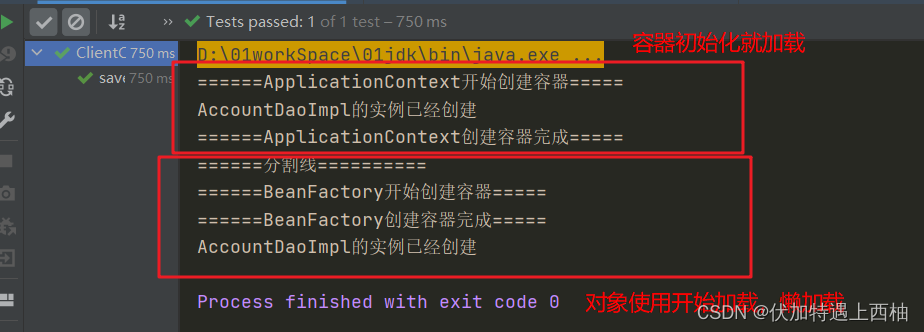
【4】加载顺序小结
1.BeanFactory是顶层接口
2.ApplicationContext是子接口
3.它们最大的区别是创建对象的时间不一样(单例的):【BeanFactory】采用的是延迟加载的思想。即什么时候使用对象,什么时候创建【ApplicationContext】采用立即创建的思想。即一加载配置文件,立即就创建
第五章 bean标签详解【重点】
1、bean标签作用
bean作用: 用于配置对象让spring 来创建的。 【细节】默认情况下调用类的无参构造函数。
2、bean标签基本属性
| 属性 | 说明 |
|---|---|
| id | bean的唯一标识名称 |
| class | 实现类的全限定名称 |
| name | bean的名称 * 多个别名使用 ”,” 分割 * bean与bean的别名不可以重复 |
入门案例中我们已经基本使用过
<?xml version="1.0" encoding="UTF-8"?>
<beans xmlns="http://www.springframework.org/schema/beans"xmlns:xsi="http://www.w3.org/2001/XMLSchema-instance"xsi:schemaLocation="http://www.springframework.org/schema/beanshttp://www.springframework.org/schema/beans/spring-beans.xsd"><bean id="accountDao" name="accountDao2,accountDao3" class="com.itheima.spring.dao.impl.AccountDaoImpl"></bean><bean id="accountService"  class="com.itheima.spring.service.impl.AccountServiceImpl"></bean></beans>
3、bean标签作用范围
| 属性 | 说明 |
|---|---|
| scope | 指定对象的作用范围。 * singleton 【默认】: 单例,所有的请求都用一个对象来处理 * prototype : 多例,每个请求用一个新的对象来处理 * request : WEB 项目中,将对象存入到 request 域中. * session : WEB 项目中,将对象存入到 session 域中. * global session : WEB 项目中,应用在集群环境.如果没有集群环境那么相当于session |
【1】思考
单例、多例他们分别在什么场景中使用?他们有什么区别?
spring默认单例,不需要修改,不要随意定义成员变量。
多例:资源共用
【2】目标
1、掌握scope的单例、多例的配置
2、掌握单例和多例的区别
【3】bean作用域实例(6)
步骤:1、改造ClientController多次获得对象2、装配bean到spring的IOC容器中,修改bean标签中scope的作用域3、观察不同作用域下获得的对象内存地址是否一致
【3.1】创建项目
拷贝项目spring-day01-04spring-ioc-xml创建spring-day01-06bean-scope结构如下
改造ClientController
package com.itheima.spring.controller;import com.itheima.spring.dao.AccountDao;
import com.itheima.spring.service.AccountService;
import org.junit.Test;
import org.springframework.beans.factory.BeanFactory;
import org.springframework.beans.factory.xml.XmlBeanFactory;
import org.springframework.context.ApplicationContext;
import org.springframework.context.support.ClassPathXmlApplicationContext;
import org.springframework.core.io.ClassPathResource;
import org.springframework.core.io.Resource;import javax.sound.midi.Soundbank;/*** @Description:测试*/
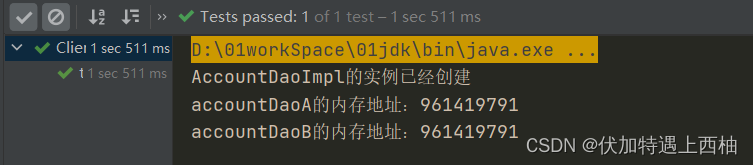
public class ClientController {@Testpublic void saveAccount() {/*** Spring-IOC容器:ApplicationContext* 构建方式:通过ClassPathXmlApplicationContext加载配置文件* 使用bean:getBean*/ApplicationContext applicationContext = new ClassPathXmlApplicationContext("bean.xml");AccountDao accountDaoA = (AccountDao) applicationContext.getBean("accountDao");AccountDao accountDaoB = (AccountDao) applicationContext.getBean("accountDao");System.out.println("accountDaoA的内存地址:"+accountDaoA.hashCode());System.out.println("accountDaoB的内存地址:"+accountDaoB.hashCode());}}【3.2】Bean【默认:singleton】
使用bean标签在bean.xml中装配accountDao的scope=“singleton”
<?xml version="1.0" encoding="UTF-8"?>
<beans xmlns="http://www.springframework.org/schema/beans"xmlns:xsi="http://www.w3.org/2001/XMLSchema-instance"xsi:schemaLocation="http://www.springframework.org/schema/beanshttp://www.springframework.org/schema/beans/spring-beans.xsd"><!--bean作用:声明一个bean交于spring容器管理属性:id:唯一标识class:实现类的全限定名称(反射)scope="singleton" 所有请求只创建一个对象,内存地址相同scope="prototype" 每次请求都创建新的对象,内存地址不同--><bean id="accountDao" class="com.itheima.spring.dao.impl.AccountDaoImpl" scope="singleton"/><bean id="accountService" class="com.itheima.spring.service.impl.AccountServiceImpl"/></beans>
【3.3】singleton运行结果
【3.4】bean【多例:prototype】
使用bean标签在bean.xml中装配accountDao的scope=“prototype”
<?xml version="1.0" encoding="UTF-8"?>
<beans xmlns="http://www.springframework.org/schema/beans"xmlns:xsi="http://www.w3.org/2001/XMLSchema-instance"xsi:schemaLocation="http://www.springframework.org/schema/beanshttp://www.springframework.org/schema/beans/spring-beans.xsd"><!--bean作用:声明一个bean交于spring容器管理属性:id:唯一标识class:实现类的全限定名称(反射)scope="singleton" 所有请求只创建一个对象,内存地址相同scope="prototype" 每次请求都创建新的对象,内存地址不同-->
<!--    <bean id="accountDao" class="com.itheima.spring.dao.impl.AccountDaoImpl" scope="singleton"/>--><bean id="accountDao" class="com.itheima.spring.dao.impl.AccountDaoImpl" scope="prototype"/><bean id="accountService" class="com.itheima.spring.service.impl.AccountServiceImpl"/></beans>
【3.5】prototype运行结果
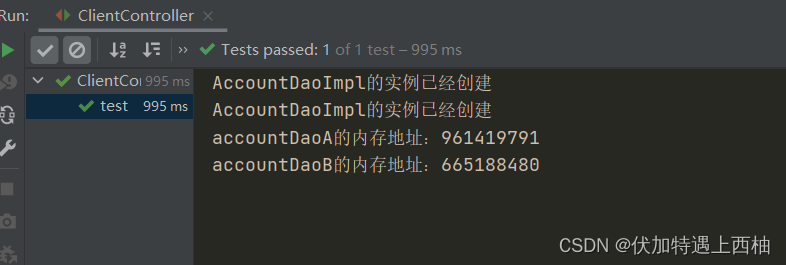
【4】bean作用域小结
1、单例和多里创建方式、内存地址【singleton单例】:所有请求只创建一个对象,内存地址相同【prototype多例】:每次请求都创建新的对象,内存地址不同
2、为什么使用单例?节省内存、CPU的开销,加快对象访问速度
3、为什么使用多例?如果你给controller中定义很多的属性,那么单例肯定会出现竞争访问,不要在controller层中定义成员变量(dao、service注入的bean)当web层的对象是有状态的时候 使用多例,防止并发情况下的互相干扰
4、单例、多例的场景单例===》spring中的Dao,Service,controller都是单例的多例====》struts2的Action是多实例
4、bean标签生命周期
sevlet的生命周期回顾
1.被创建:执行init方法,只执行一次--默认情况下,第一次被访问时,Servlet被创建,然后执行init方法;--可以配置执行Servlet的创建时机;2.提供服务:执行service的doGet、doPost方法,执行多次3.被销毁:当Servlet服务器正常关闭时,执行destroy方法,只执行一次
spring-IOC中不同作用域中bean的生命周期
| 作用范围 | 生命周期 | |
|---|---|---|
| 单例scope=“singleton” | 所有请求只创建一次对象 | 出生:应用加载,创建容器,对象就被创建 活着:只要容器在,对象一直活着。 死亡:应用卸载,销毁容器,对象就被销毁 |
| 多例scope=“prototype” | 每次请求都创建对象 | 出生:应用加载,创建容器,对象使用创建 活着:只要容器在,对象一直活着。 死亡:对象长时间不用,被垃圾回收器回收 |
生命周期方法相关
| 名称 | 说明 |
|---|---|
| init-method | 指定类中的初始化方法名称 |
| destroy-method | 指定类中销毁方法名称 |
【1】目标
1、掌握bean的生命周期配置方式
2、单例和多例下bean的生命周期的区别。
【2】bean生命周期实例(7)
步骤:1、创建LifecycBeanServic类2、装配LifecycBeanServic3、创建测试类4、观察默认单例下生命周期5、观察多例下生命周期
【2.1】创建项目
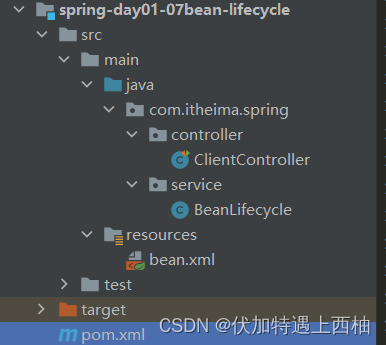
新建项目spring-day01-07bean-lifecycle
/*** @Description:生命周期测试服务*/
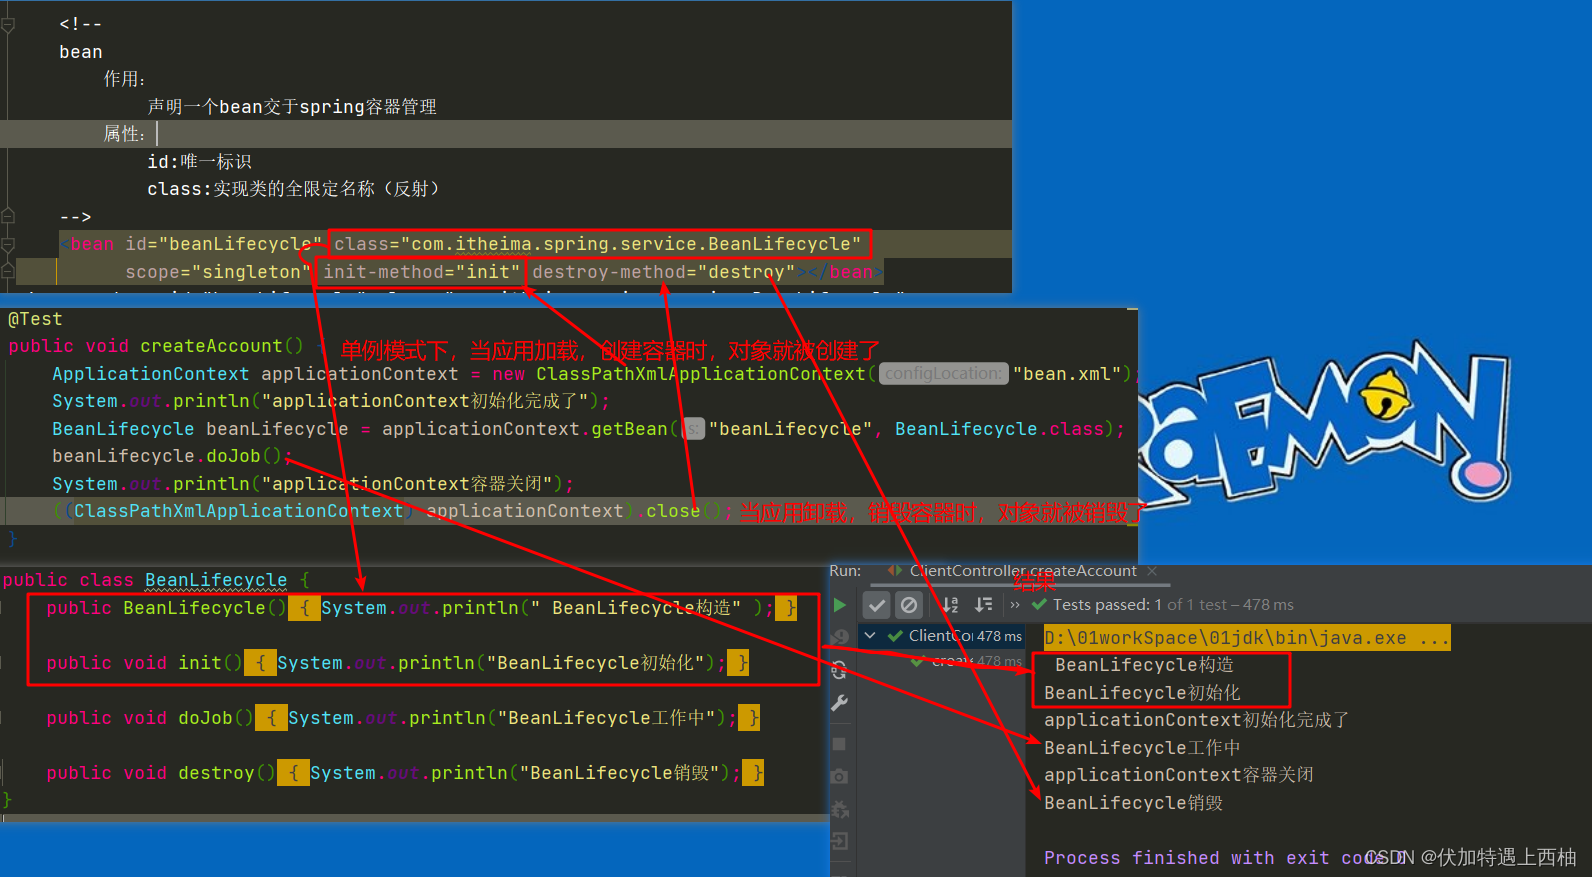
public class BeanLifecycle {public BeanLifecycle(){System.out.println(" BeanLifecycle构造" );}public void init(){System.out.println("BeanLifecycle初始化");}public void doJob(){System.out.println("BeanLifecycle工作中");}public void destroy(){System.out.println("BeanLifecycle销毁");}
}【2.3】装配LifecycleBean
装配bean并且设置问单例:
<?xml version="1.0" encoding="UTF-8"?>
<beans xmlns="http://www.springframework.org/schema/beans"xmlns:xsi="http://www.w3.org/2001/XMLSchema-instance"xsi:schemaLocation="http://www.springframework.org/schema/beanshttp://www.springframework.org/schema/beans/spring-beans.xsd"><!--bean作用:声明一个bean交于spring容器管理属性:id:唯一标识class:实现类的全限定名称(反射)--><bean id="beanLifecycle" class="com.itheima.spring.service.BeanLifecycle"scope="singleton" init-method="init" destroy-method="destroy"></bean></beans>
【2.4】创建ClientController
/*** @Description:客户端*/
public class ClientContrller {/*** ApplicationContext:spring-IOC容器* ClassPathXmlApplicationContext:容器实现类,加载配置文件* applicationContext.getBean:获得容器中的bean对象*/@Testpublic void createAccount() {ApplicationContext applicationContext = new ClassPathXmlApplicationContext("bean.xml");System.out.println("applicationContext初始化完成了");BeanLifecycle beanLifecycle = applicationContext.getBean("beanLifecycle", BeanLifecycle.class);beanLifecycle.doJob();System.out.println("applicationContext容器关闭");((ClassPathXmlApplicationContext) applicationContext).close();}
}
【2.5】单例模式下生命周期:
<?xml version="1.0" encoding="UTF-8"?>
<beans xmlns="http://www.springframework.org/schema/beans"xmlns:xsi="http://www.w3.org/2001/XMLSchema-instance"xsi:schemaLocation="http://www.springframework.org/schema/beanshttp://www.springframework.org/schema/beans/spring-beans.xsd"><!--bean作用:声明一个bean交于spring容器管理属性:id:唯一标识class:实现类的全限定名称(反射)--><bean id="beanLifecycle" class="com.itheima.spring.service.BeanLifecycle"scope="singleton" init-method="init" destroy-method="destroy"></bean></beans>
【2.6】多例模式下生命周期
将配置文件中的单例修改为多例
<?xml version="1.0" encoding="UTF-8"?>
<beans xmlns="http://www.springframework.org/schema/beans"xmlns:xsi="http://www.w3.org/2001/XMLSchema-instance"xsi:schemaLocation="http://www.springframework.org/schema/beanshttp://www.springframework.org/schema/beans/spring-beans.xsd"><!--bean作用:声明一个bean交于spring容器管理属性:id:唯一标识class:实现类的全限定名称(反射)-->
<!-- <bean id="beanLifecycle" class="com.itheima.spring.service.BeanLifecycle"-->
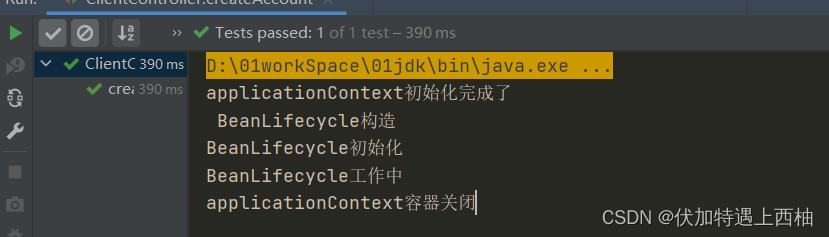
<!-- scope="singleton" init-method="init" destroy-method="destroy"></bean>--><bean id="beanLifecycle" class="com.itheima.spring.service.BeanLifecycle"scope="prototype" init-method="init" destroy-method="destroy"></bean></beans>再次执行方法发现,LifecycleBean被延迟加载了,并且只执行了初始化方法-init,没有执行销毁方法destory.
【3】bean生命周期小结
单例对象:scope="singleton"一个应用只有一个对象的实例。它的作用范围就是整个应用。生命周期:对象出生:当应用加载,创建容器时,对象就被创建了。对象活着:只要容器在,对象一直活着。对象死亡:当应用卸载,销毁容器时,对象就被销毁了。多例对象:scope="prototype"每次访问对象时,都会重新创建对象实例。生命周期:对象出生:当使用对象时,创建新的对象实例(getBean)。对象活着:只要对象在使用中,就一直活着。对象死亡:当对象长时间不用时,被垃圾回收器回收。
生命周期方法:
init-method:指定类中的初始化方法名称
destroy-method:指定类中销毁方法名称
5、bean的实例化方式(8)
bean的实例化方式有以下3种:
- bean缺省构造函数创建
- 静态factory方法创建
- 实例化factory方法创建
【1】目标
1、掌握bean实例化的三种方式
2、了解3中方式应用场景
【2】创建项目
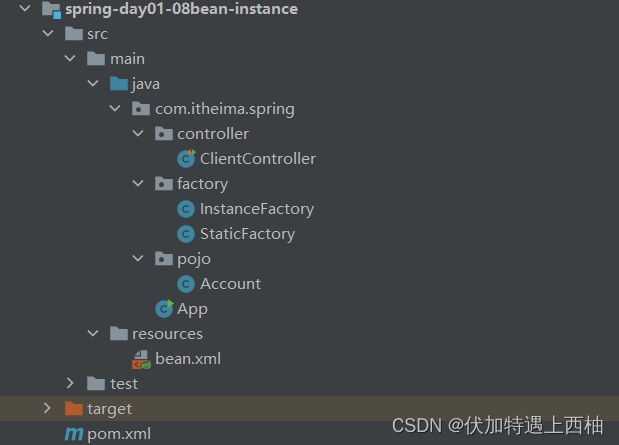
新建项目spring-day01-08bean-instance结构如下
【3】缺省构造函数方式【重点】
【3.1】配置方式
<!--空的构造方法实例化-->
<bean id="account" class="com.heima.spring.pojo.Account"></bean>
【3.2】注意事项
缺省构造函数实例化Bean的方式是Spring中默认的实例化方式;
被实例化的Bean中必须有无参构造;
【4】静态工厂方法方式
【4.1】配置方式
<!--静态工厂实例化--><bean id="accountStatic" class="com.heima.spring.factory.StaticFactory" factory-method="createAccount"></bean>
【4.2】静态工厂代码
步骤一:创建静态工厂
/*** @Description:静态工厂*/
public class StaticFactory {public static Account createAccount(){System.out.println("静态工厂创建");return new Account();}
}
步骤二:配置静态工厂
<!--静态工厂实例化--><bean id="accountStatic" class="com.itheima.spring.factory.StaticFactory" factory-method="createAccount"></bean>
【5】实例工厂方法方式
【5.1】配置方式
<!--实例化工厂实例化--><bean id="instanceFactory" class="com.itheima.spring.factory.InstanceFactory"></bean><bean id="accountInstance" factory-bean="instanceFactory" factory-method="createAccount"></bean>
【5.2】实例工厂代码
步骤一:创建实例工厂
/*** @Description:实例化工厂*/
public class InstanceFactory {public Account createAccount(){System.out.println("实例工厂构建!");return  new Account();}}
【6】bean实例化小结
【缺省构造函数方式】说明:在默认情况下会根据默认缺省构造函数来创建类对象。如果bean中没有默认无参构造函数,将会创建失败。场景:当各个bean的业务逻辑相互比较独立时,或者与外界关联较少时可以使用【静态工厂方法方式】说明:使用工厂中的静态方法创建对象,并装配到 spring的IOC 容器中。id 属性:指定 bean 的 id,用于从容器中获取 class 属性:指定静态工厂的全限定类名 factory-method 属性:指定生产对象的静态方法场景:统一管理各个bean的创建各个bean在创建之前需要相同的初始化处理,则可用静态factory方法进行统一的处理【实例工厂方法方式】说明使用工厂中的实例方法创建对象,并装配到容器中。1、先把实例工厂做为一个bean装配到 spring容器中。 2、然后再引用工厂bean 来调用里面的非静态方法来获取bean并装配到spring的IOC容器中。 factory-bean 属性:用于指定实例工厂 bean 的 id。 factory-method 属性:用于指定实例工厂中创建对象的方法场景:1.实例factory方法也作为业务bean控制,可以用于集成其他框架的bean创建管理方法,2.能够使bean和factory的角色互换
6、bean标签配置小结
1、bean标签的作用:把自己的类的对象的创建交给Spring管理2、基本配置:id:IOC工厂中bean实例的唯一标识class:实现类的全限定路径name:别名 3、bean的作用域:单例:默认,IOC工厂创建后,立即创建bean的实例对象(bean只会被实例化一次) 多例:scope="prototype" 每次从工厂中获取bean的时候,都会创建一个新的对象返回 4、bean的生命周期:单例:创建:IOC工厂创建后,立即创建bean的实例对象初始化:对象创建完成之后立刻调用工作...................销毁:IOC工厂卸载,单例bean销毁多例:出生:应用加载,创建容器,对象使用创建<br/>活着:只要容器在,对象一直活着。<br/>死亡:对象长时间不用,被垃圾回收器回收5、bean实例化的3种方式:获取对象bean缺省构造函数创建 静态factory方法创建 实例化factory方法创建第六章 spring的依赖注入(DI)【重点】
1、DI是什么?
【1】DI概念
依赖注入:Dependency Injection(简称DI注入)。它是spring框架核心 ioc容器,bean属性值赋值的具体方案
【2】思考
在上面的课程中,我们在程序编写时,通过控制反转,把对象的创建交给了 spring,但是这种方式仅仅是降低了代码中的依赖关系,并不会完全消除依赖。例如:我们的业务层仍会调用持久层的方法,如图所示:
而所谓的依赖注入,可以先简单的理解为由spring框架来帮助我们以解耦的方式将dao传递到service中
目的
以解耦的方式给属性进行赋值,简称DI注入。
2、依赖注入(DI)的2种方式【重点】
DI注入的方式有2种:
-
set方法注入
-
构造方法注入
【1】set方法注入(9)
【1.1】目标
使用类中属性的set方法,给属性赋值。
注意,赋值的操作不是我们硬编码的,而是通过配置的方式,让spring框架来为我们注入。
要求:1、bean中必须提供属性的set方法2、bean标签中通过proprety标签注入属性
【1.2】实现
步骤:1、为属性提供set方法2、修改bean.xml的property注入
【1.2.1】创建项目
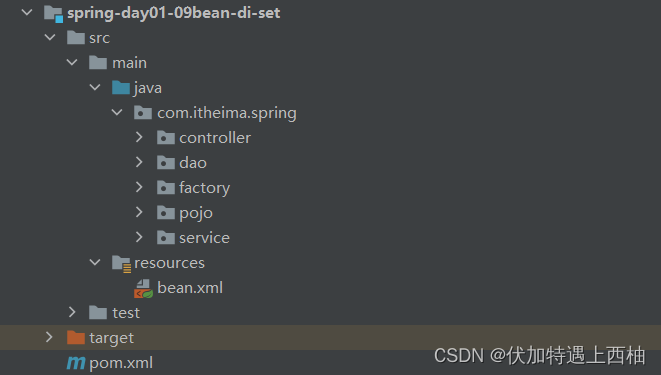
拷贝spring-day01-04spring-ioc-xml创建spring-day01-09bean-di-set结构如下
【1.2.2】修改AccountServicImpl提供属性的set方法
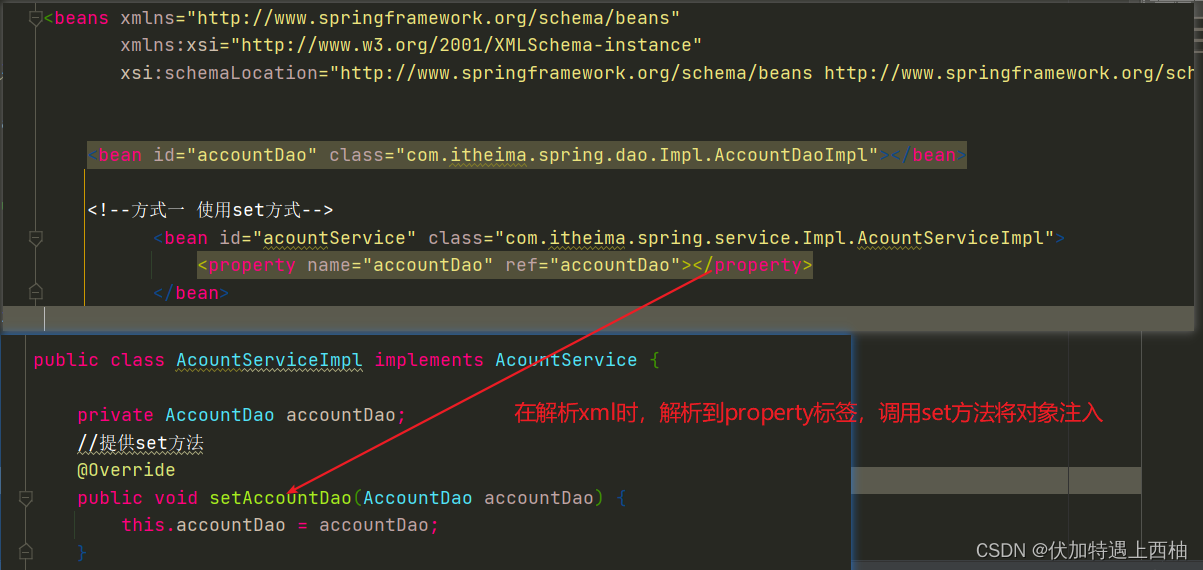
public class AcountServiceImpl implements AcountService {private AccountDao accountDao;//提供set方法@Overridepublic void setAccountDao(AccountDao accountDao) {this.accountDao = accountDao;}//    public AcountServiceImpl(AccountDao accountDao) {
//        this.accountDao = accountDao;
//    }@Overridepublic void saveAccount() {accountDao.saveAccount();}@Overridepublic void delAccount() {accountDao.delAccount();}@Overridepublic void updateAccout() {accountDao.updateAccout();}@Overridepublic void findAccount() {accountDao.findAccount();}}
【1.2.3】编写bean.xml
<?xml version="1.0" encoding="UTF-8"?>
<beans xmlns="http://www.springframework.org/schema/beans"xmlns:xsi="http://www.w3.org/2001/XMLSchema-instance"xsi:schemaLocation="http://www.springframework.org/schema/beanshttp://www.springframework.org/schema/beans/spring-beans.xsd"><!--bean:实例化对象id:bean的唯一标示class:实现类的全路径(反射使用)细节:默认使用无参数构造函数实例化--><bean id="accountDao" class="com.itheima.spring.dao.Impl.AccountDaoImpl"></bean><!--方式一 使用set方式--><bean id="acountService" class="com.itheima.spring.service.Impl.AcountServiceImpl"><property name="accountDao" ref="accountDao"></property></bean></beans>
【1.2.4】ClientController测试
public class ClientController {@Testpublic void saveAccount(){/*1、导入依赖2、编写bean.xml文件替换properties3、使用ClassPathXmlApplicationContext加载bean.xml配置文件4、使用ApplicationContext工厂的getBean()方法获得bean*/ApplicationContext applicationContext=new ClassPathXmlApplicationContext("bean.xml");AcountService acountService = (AcountService) applicationContext.getBean("acountService");acountService.saveAccount();}
}

【1.3】set方法注入小结
set注入要求:1、bean中必须提供属性的set方法2、在bean标签中通过proprety标签注入属性
【2】构造函数注入(10)
【2.1】目标
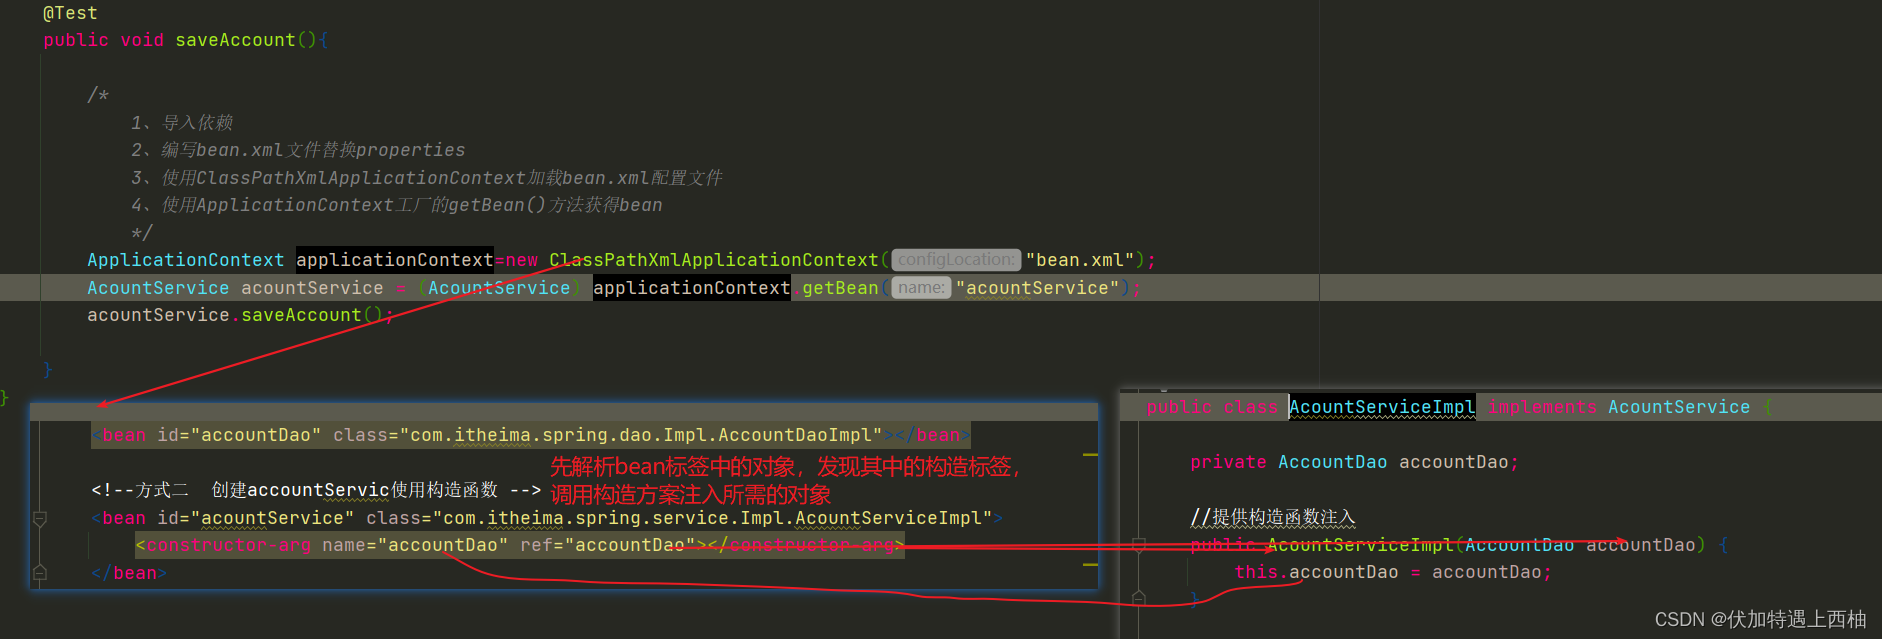
使用类中的构造函数,给成员变量赋值。注意,赋值的操作不是我们硬编码的,而是通过配置的方式,让spring框架来为我们注入。要求:1、bean对象需要创建有参数的构造方法2、在配置文件中通过constructor-arg标签注入属性
【2.2】实现
【2.1】创建项目
拷贝spring-day01-09bean-di-set创建spring-day01-10bean-di-construction结构如下
【2.2】修改AccountServicImpl添加构造函数
public class AcountServiceImpl implements AcountService {private AccountDao accountDao;//提供构造函数注入public AcountServiceImpl(AccountDao accountDao) {this.accountDao = accountDao;}//提供set方法@Overridepublic void setAccountDao(AccountDao accountDao) {this.accountDao = accountDao;}@Overridepublic void saveAccount() {accountDao.saveAccount();}@Overridepublic void delAccount() {accountDao.delAccount();}@Overridepublic void updateAccout() {accountDao.updateAccout();}@Overridepublic void findAccount() {accountDao.findAccount();}}【2.3】编写bean.xml
<?xml version="1.0" encoding="UTF-8"?>
<beans xmlns="http://www.springframework.org/schema/beans"xmlns:xsi="http://www.w3.org/2001/XMLSchema-instance"xsi:schemaLocation="http://www.springframework.org/schema/beans http://www.springframework.org/schema/beans/spring-beans.xsd"><bean id="accountDao" class="com.itheima.spring.dao.Impl.AccountDaoImpl"></bean><!--方式一 使用set方式-->
<!--    <bean id="acountService" class="com.itheima.spring.service.Impl.AcountServiceImpl">-->
<!--        <property name="accountDao" ref="accountDao"></property>-->
<!--    </bean>--><!--方式二  创建accountServic使用构造函数 --><bean id="acountService" class="com.itheima.spring.service.Impl.AcountServiceImpl"><constructor-arg name="accountDao" ref="accountDao"></constructor-arg></bean>
</beans>
【2.4】ClientController测试
package com.heima.spring.controller;import com.heima.spring.service.AccountServic;
import org.junit.jupiter.api.Test;
import org.springframework.context.ApplicationContext;
import org.springframework.context.support.ClassPathXmlApplicationContext;/*** @Description:调用层*/
public class ClientController {@Testpublic void saveAccount(){/*1、导入依赖2、编写bean.xml文件替换properties3、使用ClassPathXmlApplicationContext加载bean.xml配置文件4、使用ApplicationContext工厂的getBean()方法获得bean*/ApplicationContext applicationContext=new ClassPathXmlApplicationContext("bean.xml");AcountService acountService = (AcountService) applicationContext.getBean("acountService");acountService.saveAccount();}
}
【2.3】构造函数注入小结
构造方式:默认:使用无参数构造方法,创建对象set方式:property 指定属性name:按属性名ref:指定注入bean的Id构造函数:constructor-arg:构造函数name:按属性名index:按下标注type:按类型
3、依赖注入的简单配置【了解】
简单名称空间注入只是set方法注入和构造方法注入的简化方式,其本质是相同的
【1】P标签方式(set方法)(11)
【1.1】目标
p名称空间注入,就是set方法注入。其本质在于简化配置,
bean.xml中添加
空间名: xmlns:p="http://www.springframework.org/schema/p"
【1.2】实现
【1.2.1】创建项目
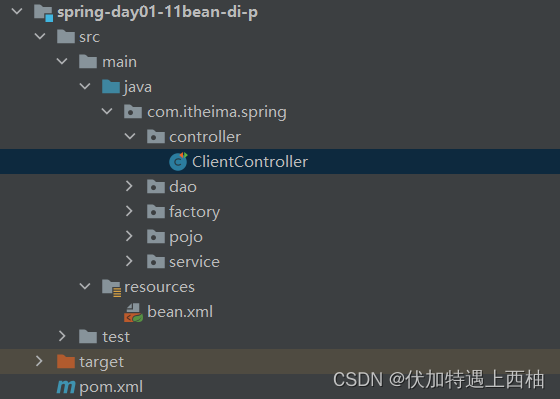
拷贝spring-day01-9bean-di-set创建spring-day01-11bean-di-p结构如下
【1.2.2】修改bean.xml
<?xml version="1.0" encoding="UTF-8"?>
<beans xmlns="http://www.springframework.org/schema/beans"xmlns:xsi="http://www.w3.org/2001/XMLSchema-instance"xmlns:p="http://www.springframework.org/schema/p"xsi:schemaLocation="http://www.springframework.org/schema/beanshttp://www.springframework.org/schema/beans/spring-beans.xsd"><bean id="accountDao" class="com.itheima.spring.dao.Impl.AccountDaoImpl"></bean><bean id="acountService" class="com.itheima.spring.service.Impl.AcountServiceImpl" p:accountDao-ref="accountDao"></bean></beans>
【1.2.3】ClientController测试
【2】C标签方式(构造函数)(12)
【2.1】目标
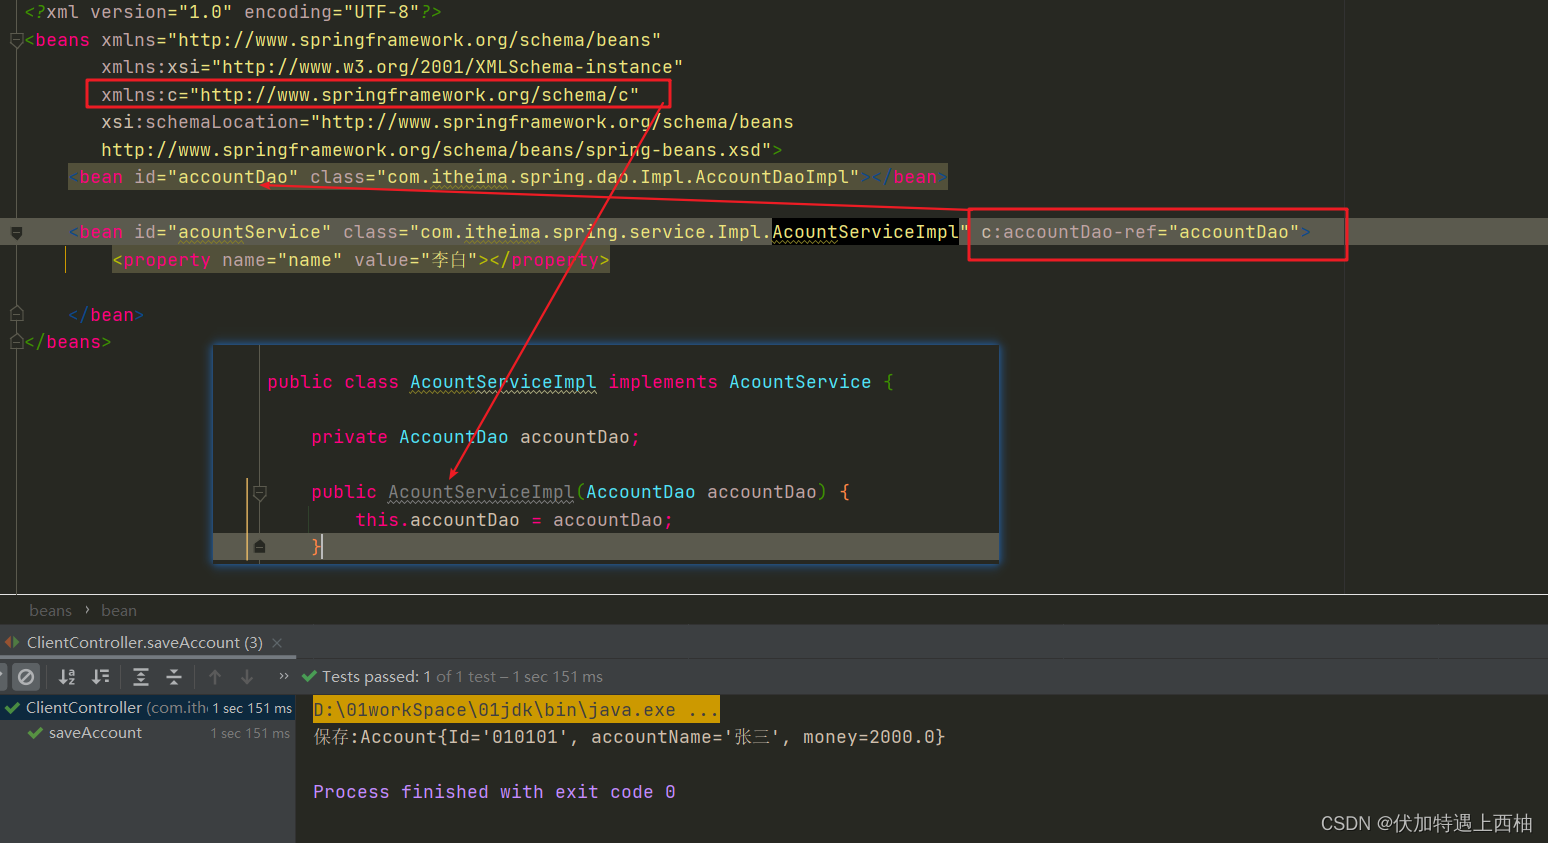
c名称空间注入,就是构造函数注入。其本质在于简化配置,
空间名: xmlns:c="http://www.springframework.org/schema/c"
【2.2】实现
【2.1.1】创建项目
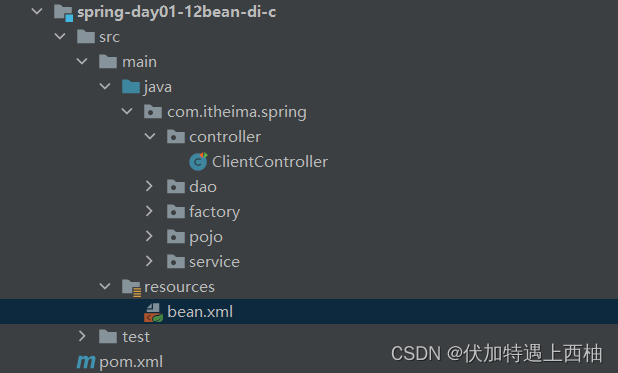
拷贝spring-day01-10bean-di-construction创建spring-day01-12bean-di-c结构如下
【2.1.2】修改bean.xml
<?xml version="1.0" encoding="UTF-8"?>
<beans xmlns="http://www.springframework.org/schema/beans"xmlns:xsi="http://www.w3.org/2001/XMLSchema-instance"xmlns:c="http://www.springframework.org/schema/c"xsi:schemaLocation="http://www.springframework.org/schema/beanshttp://www.springframework.org/schema/beans/spring-beans.xsd"><bean id="accountDao" class="com.itheima.spring.dao.Impl.AccountDaoImpl"></bean><bean id="acountService" class="com.itheima.spring.service.Impl.AcountServiceImpl" c:accountDao-ref="accountDao"></bean>
</beans>
【2.1.3】ClientController测试
【3】简单配置小结
P名称空间注入,就是set方法注入。其本质在于简化配置,
空间名:xmlns:p="http://www.springframework.org/schema/pc名称空间注入,就是构造函数注入。其本质在于简化配置,
空间名: xmlns:c="http://www.springframework.org/schema/c"
4、复杂类型的注入(13)【了解】
我们知道了自定对象,及基础对象的注入方式,那么数组、List、Set、Map、Properties是怎么配置的呢?
【1】目标
给类中的复杂的属性注入数据,比如集合或者数组, 我们这里介绍注入数组、List、Set、Map、Properties。
【2】实现
【2.1】创建项目
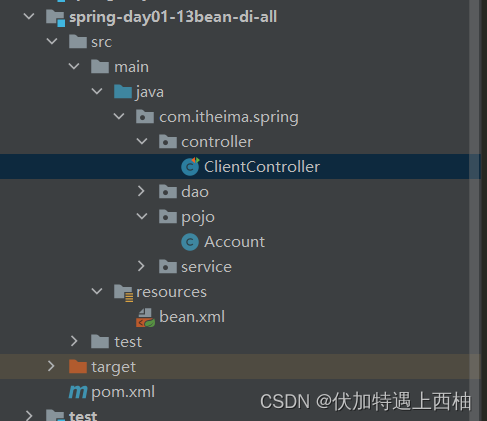
拷贝spring-day01-12bean-di-c创建spring-day01-13bean-di-all结构如下
【2.2】创建Account
package com.itheima.spring.pojo;import java.util.*;/*** @Description:账户实体类*/
public class Account {//账户编号private String Id;//账户所有者private String accountName;//账户余额private Float money;private String[] myStrs;private List<String> myList;private Set<String> mySet;private Map<String, String> myMap;private Properties myProps;public Account() {}public String getId() {return Id;}public void setId(String id) {Id = id;}public String getAccountName() {return accountName;}public void setAccountName(String accountName) {this.accountName = accountName;}public Float getMoney() {return money;}public void setMoney(Float money) {this.money = money;}public String[] getMyStrs() {return myStrs;}public void setMyStrs(String[] myStrs) {this.myStrs = myStrs;}public List<String> getMyList() {return myList;}public void setMyList(List<String> myList) {this.myList = myList;}public Set<String> getMySet() {return mySet;}public void setMySet(Set<String> mySet) {this.mySet = mySet;}public Map<String, String> getMyMap() {return myMap;}public void setMyMap(Map<String, String> myMap) {this.myMap = myMap;}public Properties getMyProps() {return myProps;}public void setMyProps(Properties myProps) {this.myProps = myProps;}@Overridepublic String toString() {return "Account{" +"Id='" + Id + '\'' +", accountName='" + accountName + '\'' +", money=" + money +", myStrs=" + Arrays.toString(myStrs) +", myList=" + myList +", mySet=" + mySet +", myMap=" + myMap +", myProps=" + myProps +'}';}
}
【2.3】编写bean.xml
 <?xml version="1.0" encoding="UTF-8"?>
<beans xmlns="http://www.springframework.org/schema/beans"xmlns:xsi="http://www.w3.org/2001/XMLSchema-instance"xsi:schemaLocation="http://www.springframework.org/schema/beanshttp://www.springframework.org/schema/beans/spring-beans.xsd"><bean id="account" class="com.itheima.spring.pojo.Account"><property name="id" value="1111"></property><property name="accountName" value="小王"></property><property name="money" value="2000"></property><!--注入集合属性:使用set方法注入集合属性:array:一般用来设置数组list:一般用来设置list集合map:一般用来设置map集合props:一般用来设置properties--><property name="myStrs"><array><value>AAA</value><value>BBB</value><value>CCC</value></array></property><property name="myList"><list><value>AAA</value><value>BBB</value><value>CCC</value></list></property><property name="mySet"><set><value>AAA</value><value>BBB</value><value>CCC</value></set></property><property name="myMap"><map><entry key="name1" value="AAA"></entry><entry key="name2" value="BBB"></entry><entry key="name3" value="CCC"></entry></map></property><property name="myProps"><props><prop key="name1">AAA</prop><prop key="name2">BBB</prop><prop key="name3">CCC</prop></props></property></bean>
</beans>
【2.4】controller测试
public class ClientController {@Testpublic void createAccountTest(){//加载配置文件ApplicationContext applicationContext =new ClassPathXmlApplicationContext("classpath:bean.xml");//获得beanAccount account = (Account) applicationContext.getBean("account");//打印结果System.out.println("account的对象信息"+account.toString());}
}
【运行结果】
account的对象信息Account{Id='1111', accountName='小王', money=2000.0, myStrs=[AAA, BBB, CCC],myList=[AAA, BBB, CCC], mySet=[AAA, BBB, CCC],myMap={name1=AAA, name2=BBB, name3=CCC}, myProps={name3=CCC, name2=BBB, name1=AAA}}
【3】复杂对象注入小结
使用set方法注入集合属性:array:一般用来设置数组list:一般用来设置list集合map:一般用来设置map集合props:一般用来设置properties