自己买空间让网络公司做网站好吗网络推广项目外包公司
Pytorch_Sequential使用、损失函数、反向传播和优化器
文章目录
- nn.Sequential
- 搭建小实战
- 损失函数与反向传播
- 优化器
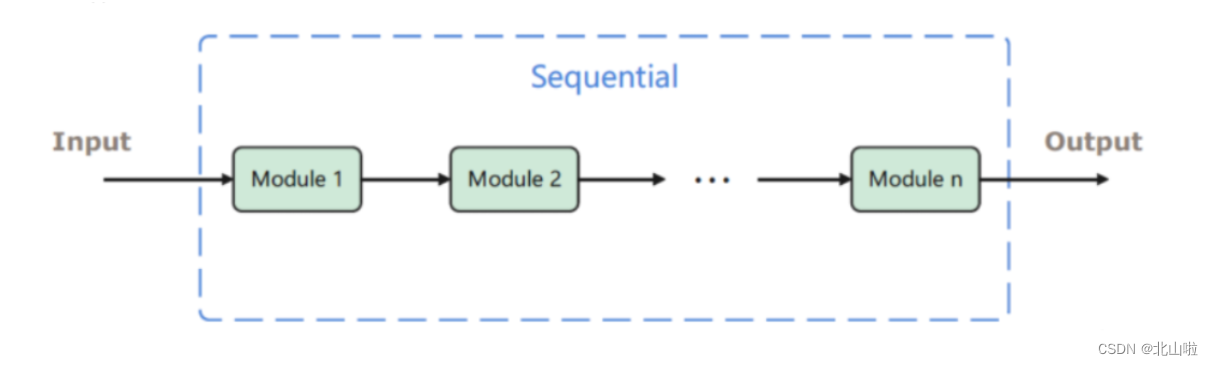
nn.Sequential
nn.Sequential是一个有序的容器,用于搭建神经网络的模块被按照被传入构造器的顺序添加到nn.Sequential()容器中。
import torch.nn  as nn
from collections import OrderedDict
# Using Sequential to create a small model. When `model` is run,
# input will first be passed to `Conv2d(1,20,5)`. The output of
# `Conv2d(1,20,5)` will be used as the input to the first
# `ReLU`; the output of the first `ReLU` will become the input
# for `Conv2d(20,64,5)`. Finally, the output of
# `Conv2d(20,64,5)` will be used as input to the second `ReLU`
model = nn.Sequential(nn.Conv2d(1,20,5),nn.ReLU(),nn.Conv2d(20,64,5),nn.ReLU())# Using Sequential with OrderedDict. This is functionally the
# same as the above code
model = nn.Sequential(OrderedDict([('conv1', nn.Conv2d(1,20,5)),('relu1', nn.ReLU()),('conv2', nn.Conv2d(20,64,5)),('relu2', nn.ReLU())]))
print(model)
Sequential((conv1): Conv2d(1, 20, kernel_size=(5, 5), stride=(1, 1))(relu1): ReLU()(conv2): Conv2d(20, 64, kernel_size=(5, 5), stride=(1, 1))(relu2): ReLU()
)
搭建小实战
还是以 C I F A R − 10 m o d e l CIFAR-10 model CIFAR−10model为例
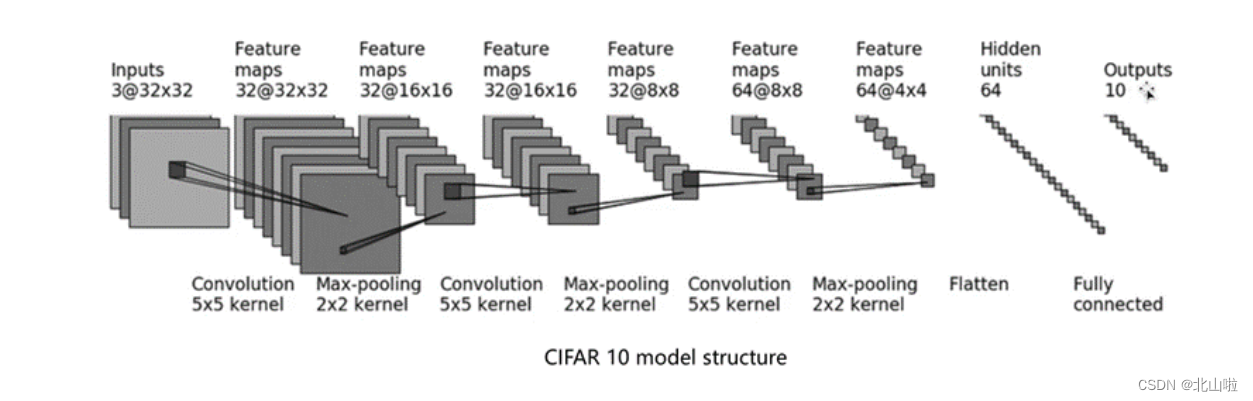
- 输入图像是3通道的32×32的
- 先后经过卷积层(5×5的卷积核)
- 最大池化层(2×2的池化核)
- 卷积层(5×5的卷积核)
- 最大池化层(2×2的池化核)
- 卷积层(5×5的卷积核)
- 最大池化层(2×2的池化核)
- 拉直(flatten)
- 全连接层的处理,
- 最后输出的大小为10
基于以上的介绍,后续将利用Pytorch构建模型,实现 C I F A R − 10 m o d e l s t r u c t u r e CIFAR-10 \quad model \quad structure CIFAR−10modelstructure
参数说明:in_channels: int、out_channels: int,kernel_size: Union由input、特征图以及卷积核即可看出,而stride、padding需要通过公式计算得到。
特得到的具体的特征图尺寸的计算公式如下:
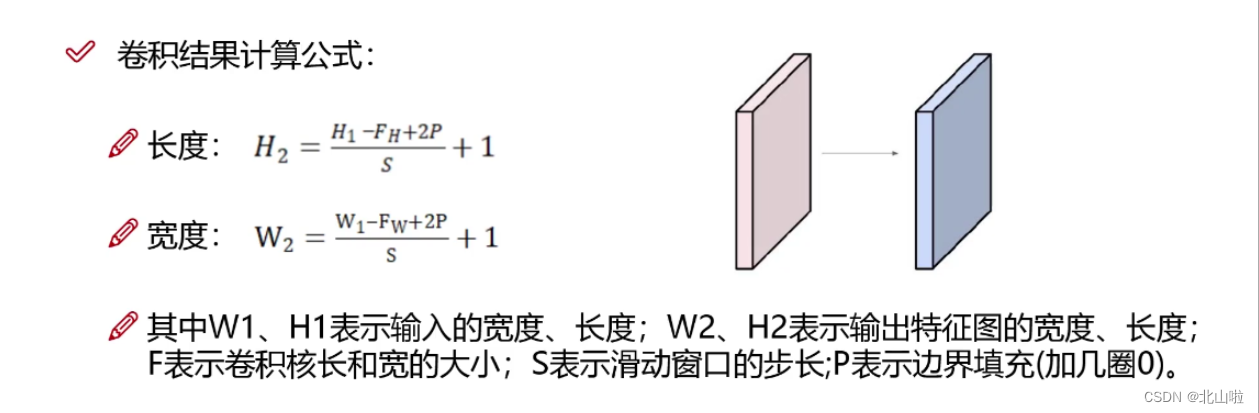
inputs : 3@32x32,3通道32x32的图片,5*5的kernel --> 特征图(Feature maps) : 32@32x32
即经过32个3@5x5的卷积层,输出尺寸没有变化(有x个卷积核即由x个卷积核,卷积核的通道数与输入的通道数相等)
由上述的计算公式来计算出 s t r i d e stride stride和 p a d d i n g padding padding
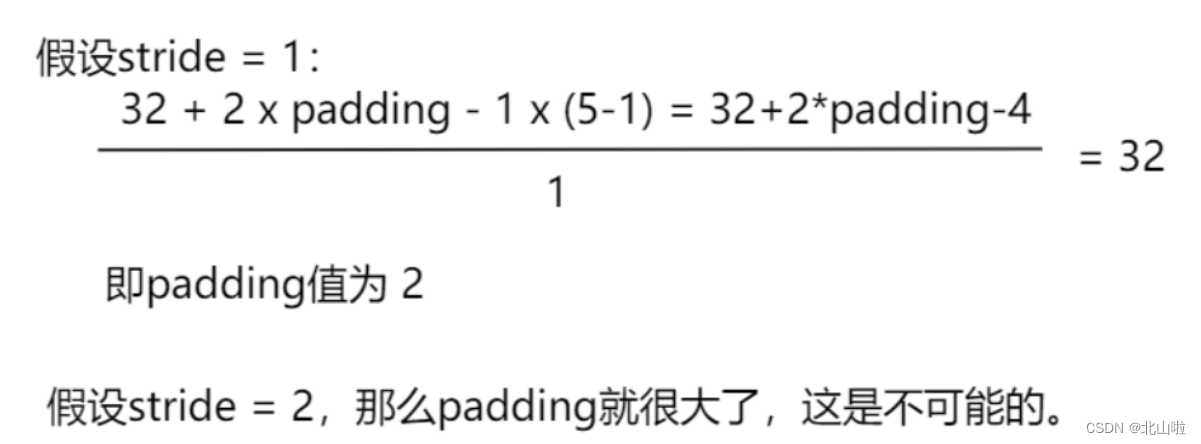
卷积层中的stride默认为1
池化层中的stride默认为kernel_size的大小
import torch
import torch.nn as nn
import torchvision
from torch.utils.data import DataLoader
from torch.utils.tensorboard import SummaryWriter
class BS(nn.Module):def __init__(self):super().__init__()self.conv1 = nn.Conv2d(in_channels=3,out_channels=32,kernel_size=5,stride=1,padding=2)  #stride和padding计算得到self.maxpool1 = nn.MaxPool2d(kernel_size=2)self.conv2 = nn.Conv2d(in_channels=32,out_channels=32,kernel_size=5,stride=1,padding=2)self.maxpool2 = nn.MaxPool2d(kernel_size=2)self.conv3 = nn.Conv2d(in_channels=32,out_channels=64,kernel_size=5,padding=2)self.maxpool3 = nn.MaxPool2d(kernel_size=2)self.flatten = nn.Flatten()  #变为63*4*4=1024self.linear1 = nn.Linear(in_features=1024, out_features=64)self.linear2 = nn.Linear(in_features=64, out_features=10)def forward(self,x):x = self.conv1(x)x = self.maxpool1(x)x = self.conv2(x)x = self.maxpool2(x)x = self.conv3(x)x = self.maxpool3(x)x = self.flatten(x)x = self.linear1(x)x = self.linear2(x)return xbs = BS()
bs
BS((conv1): Conv2d(3, 32, kernel_size=(5, 5), stride=(1, 1), padding=(2, 2))(maxpool1): MaxPool2d(kernel_size=2, stride=2, padding=0, dilation=1, ceil_mode=False)(conv2): Conv2d(32, 32, kernel_size=(5, 5), stride=(1, 1), padding=(2, 2))(maxpool2): MaxPool2d(kernel_size=2, stride=2, padding=0, dilation=1, ceil_mode=False)(conv3): Conv2d(32, 64, kernel_size=(5, 5), stride=(1, 1), padding=(2, 2))(maxpool3): MaxPool2d(kernel_size=2, stride=2, padding=0, dilation=1, ceil_mode=False)(flatten): Flatten(start_dim=1, end_dim=-1)(linear1): Linear(in_features=1024, out_features=64, bias=True)(linear2): Linear(in_features=64, out_features=10, bias=True)
)
利用Sequential优化代码,并在tensorboard显示
.add_graph函数用于将PyTorch模型图添加到TensorBoard中。通过这个函数,您可以以可视化的方式展示模型的计算图,使其他人更容易理解您的模型结构和工作流程。
add_graph(model, input_to_model, strip_default_attributes=True)
- model:要添加的PyTorch模型。
- input_to_model:用于生成模型图的输入数据。
- strip_default_attributes:是否删除模型中的默认属性,默认为True。
class BS(nn.Module):def __init__(self):super().__init__()self.model = nn.Sequential(nn.Conv2d(in_channels=3,out_channels=32,kernel_size=5,stride=1,padding=2),  #stride和padding计算得到nn.MaxPool2d(kernel_size=2),nn.Conv2d(in_channels=32,out_channels=32,kernel_size=5,stride=1,padding=2),nn.MaxPool2d(kernel_size=2),nn.Conv2d(in_channels=32,out_channels=64,kernel_size=5,padding=2),nn.MaxPool2d(kernel_size=2),nn.Flatten(),  #变为64*4*4=1024nn.Linear(in_features=1024, out_features=64),nn.Linear(in_features=64, out_features=10),)def forward(self,x):x = self.model(x)return xbs = BS()
print(bs)
BS((model): Sequential((0): Conv2d(3, 32, kernel_size=(5, 5), stride=(1, 1), padding=(2, 2))(1): MaxPool2d(kernel_size=2, stride=2, padding=0, dilation=1, ceil_mode=False)(2): Conv2d(32, 32, kernel_size=(5, 5), stride=(1, 1), padding=(2, 2))(3): MaxPool2d(kernel_size=2, stride=2, padding=0, dilation=1, ceil_mode=False)(4): Conv2d(32, 64, kernel_size=(5, 5), stride=(1, 1), padding=(2, 2))(5): MaxPool2d(kernel_size=2, stride=2, padding=0, dilation=1, ceil_mode=False)(6): Flatten(start_dim=1, end_dim=-1)(7): Linear(in_features=1024, out_features=64, bias=True)(8): Linear(in_features=64, out_features=10, bias=True))
)
# 在tensorboard中显示
input_ = torch.ones((64,3,32,32))
writer = SummaryWriter(".logs")
writer.add_graph(bs, input_)  # 定义的模型,数据
writer.close()
利用tensorboard可视化网络结构graph如下

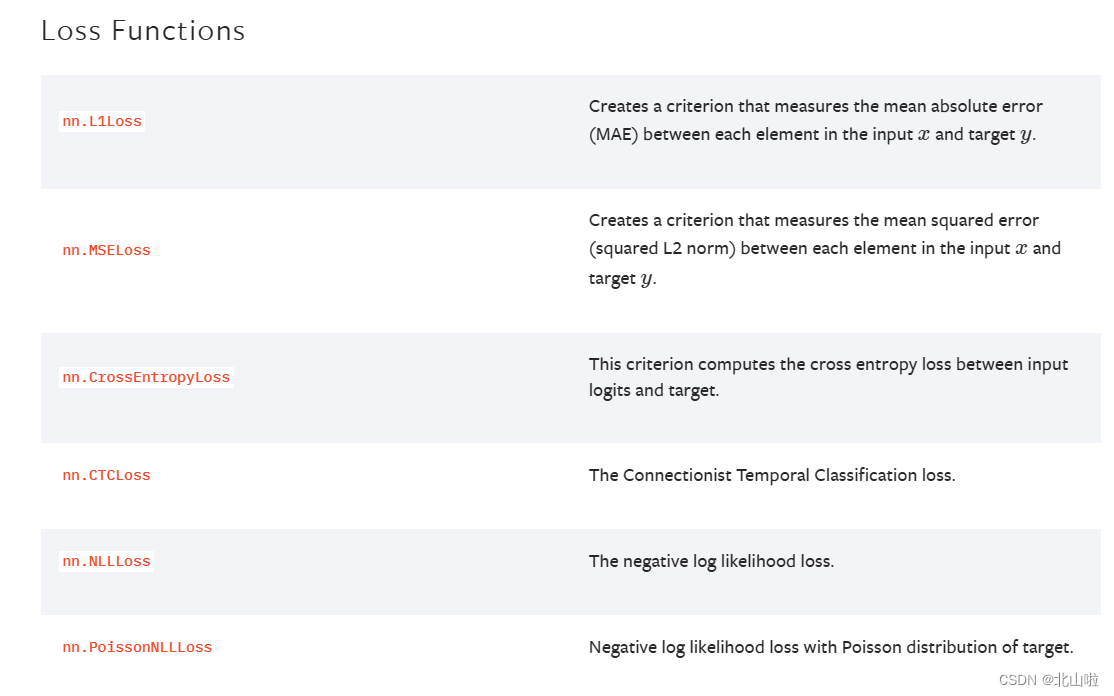
损失函数与反向传播
计算模型目标输出和实际输出之间的误差。并通过反向传播算法更新模型的权重和参数,以减小预测输出和实际输出之间的误差。
- 计算实际输出和目标输出之间的差距
- 为更新输出提供一定依据(反向传播)
不同的模型用的损失函数一般也不一样。
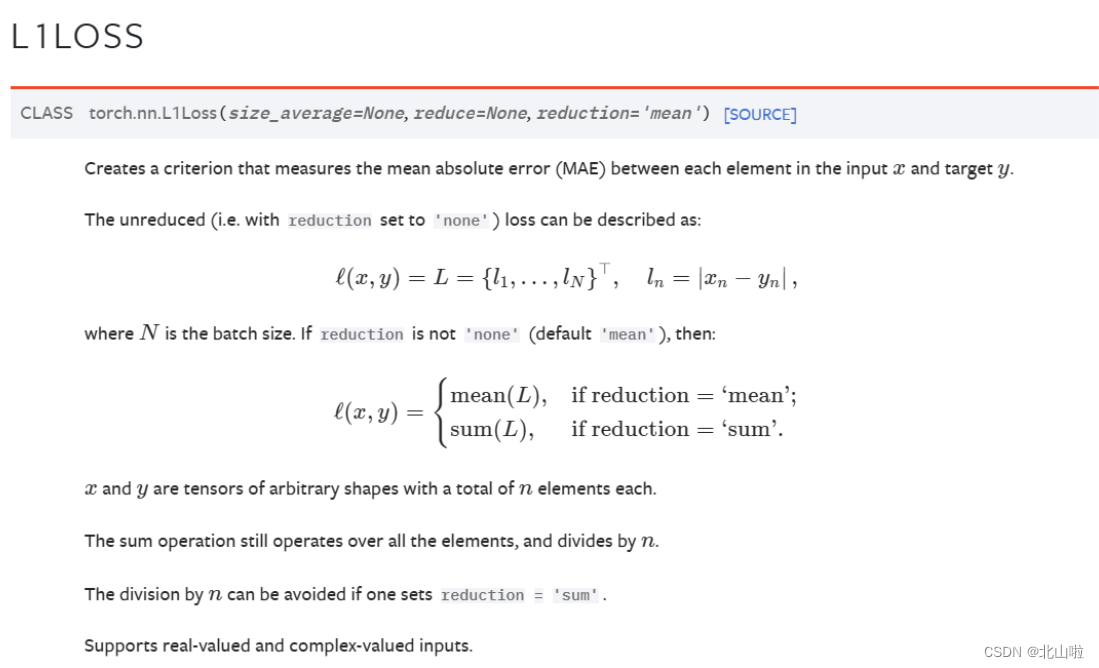
平均绝对误差MAE Mean Absolute Error
torch.nn.L1Loss(size_average=None, reduce=None, reduction=‘mean’)
import torch
import torch.nn as nn
# 实例化
criterion1 = nn.L1Loss(reduction='mean')#mean
criterion2 = nn.L1Loss(reduction="sum")#sum
output = torch.tensor([1.0, 2.0, 3.0])#或dtype=torch.float32
target = torch.tensor([2.0, 2.0, 2.0])#或dtype=torch.float32
# 平均值损失值
loss = criterion1(output, target)
print(loss)  # 输出:tensor(0.6667)
# 误差和
loss1 = criterion2(output,target)
print(loss1) # tensor(2.)
tensor(0.6667)
tensor(2.)
loss = nn.L1Loss()
input = torch.randn(3, 5, requires_grad=True)
target = torch.randn(3, 5)
output = loss(input, target)
output.backward()
output
tensor(1.0721, grad_fn=<MeanBackward0>)
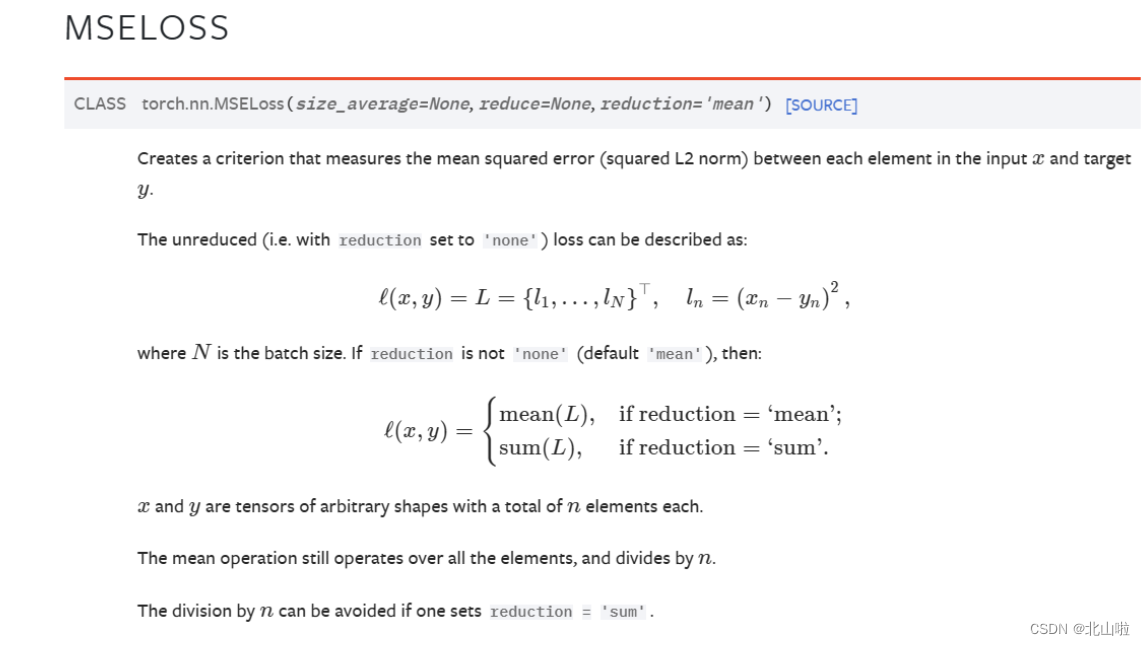
均方误差MSE Mean-Square Error
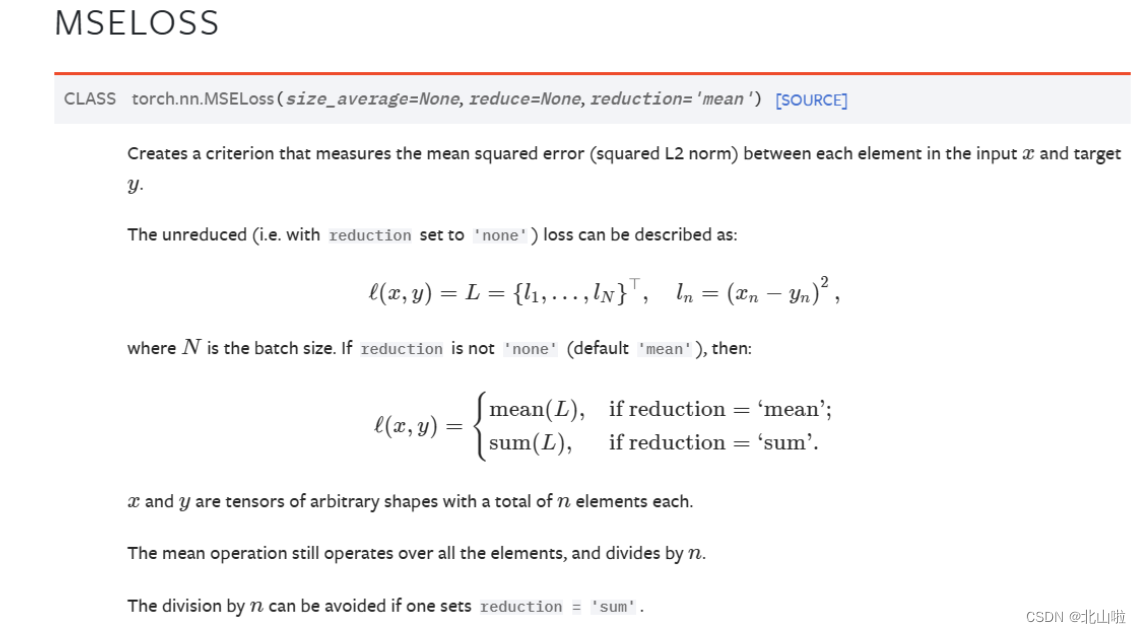
torch.nn.MSELoss(size_average=None, reduce=None, reduction=‘mean’)
import torch.nn as nn
# 实例化
criterion1 = nn.MSELoss(reduction='mean')
criterion2 = nn.MSELoss(reduction="sum")
output = torch.tensor([1, 2, 3],dtype=torch.float32)
target = torch.tensor([1, 2, 5],dtype=torch.float32)
# 平均值损失值
loss = criterion1(output, target)
print(loss)  # 输出:tensor(1.3333)
# 误差和
loss1 = criterion2(output,target)
print(loss1) # tensor(4.)
tensor(1.3333)
tensor(4.)
交叉熵损失 CrossEntropyLoss
torch.nn.CrossEntropyLoss(weight=None,size_average=None,ignore_index=-100,reduce=None,reduction='mean',label_smoothing=0.0)
当你有一个不平衡的训练集时,这是特别有用的

import torch
import torch.nn as nn# 设置三分类问题,假设是人的概率是0.1,狗的概率是0.2,猫的概率是0.3
x = torch.tensor([0.1, 0.2, 0.3])
print(x)
y = torch.tensor([1]) # 设目标标签为1,即0.2狗对应的标签,目标标签张量y
x = torch.reshape(x, (1, 3))  # tensor([[0.1000, 0.2000, 0.3000]]),批次大小为1,分类数3,即为3分类
print(x)
print(y)
# 实例化对象
loss_cross = nn.CrossEntropyLoss()
# 计算结果
result_cross = loss_cross(x, y)
print(result_cross)
tensor([0.1000, 0.2000, 0.3000])
tensor([[0.1000, 0.2000, 0.3000]])
tensor([1])
tensor(1.1019)
import torch
import torchvision
from torch.utils.data import DataLoader# 准备数据集
dataset = torchvision.datasets.CIFAR10(root="dataset",train=False,transform=torchvision.transforms.ToTensor(),download=True)
# 数据集加载器
dataloader = DataLoader(dataset, batch_size=1)
"""
输入图像是3通道的32×32的,
先后经过卷积层(5×5的卷积核)、
最大池化层(2×2的池化核)、
卷积层(5×5的卷积核)、
最大池化层(2×2的池化核)、
卷积层(5×5的卷积核)、
最大池化层(2×2的池化核)、
拉直、
全连接层的处理,
最后输出的大小为10
"""# 搭建神经网络
class BS(nn.Module):def __init__(self):super().__init__()self.model = nn.Sequential(nn.Conv2d(in_channels=3,out_channels=32,kernel_size=5,stride=1,padding=2),  #stride和padding计算得到nn.MaxPool2d(kernel_size=2),nn.Conv2d(in_channels=32,out_channels=32,kernel_size=5,stride=1,padding=2),nn.MaxPool2d(kernel_size=2),nn.Conv2d(in_channels=32,out_channels=64,kernel_size=5,padding=2),nn.MaxPool2d(kernel_size=2),nn.Flatten(),  #变为64*4*4=1024nn.Linear(in_features=1024, out_features=64),nn.Linear(in_features=64, out_features=10),)def forward(self, x):x = self.model(x)return x# 实例化
bs = BS()
loss = torch.nn.CrossEntropyLoss()
# 对每一张图片进行CrossEntropyLoss损失函数计算
# 使用损失函数loss计算预测结果和目标标签之间的交叉熵损失for inputs,labels in dataloader:outputs = bs(inputs)result = loss(outputs,labels)print(result)
tensor(2.3497, grad_fn=<NllLossBackward0>)
tensor(2.2470, grad_fn=<NllLossBackward0>)
tensor(2.2408, grad_fn=<NllLossBackward0>)
tensor(2.2437, grad_fn=<NllLossBackward0>)
tensor(2.3121, grad_fn=<NllLossBackward0>)
........
优化器
优化器(Optimizer)是用于更新神经网络参数的工具
它根据计算得到的损失函数的梯度来调整模型的参数,以最小化损失函数并改善模型的性能
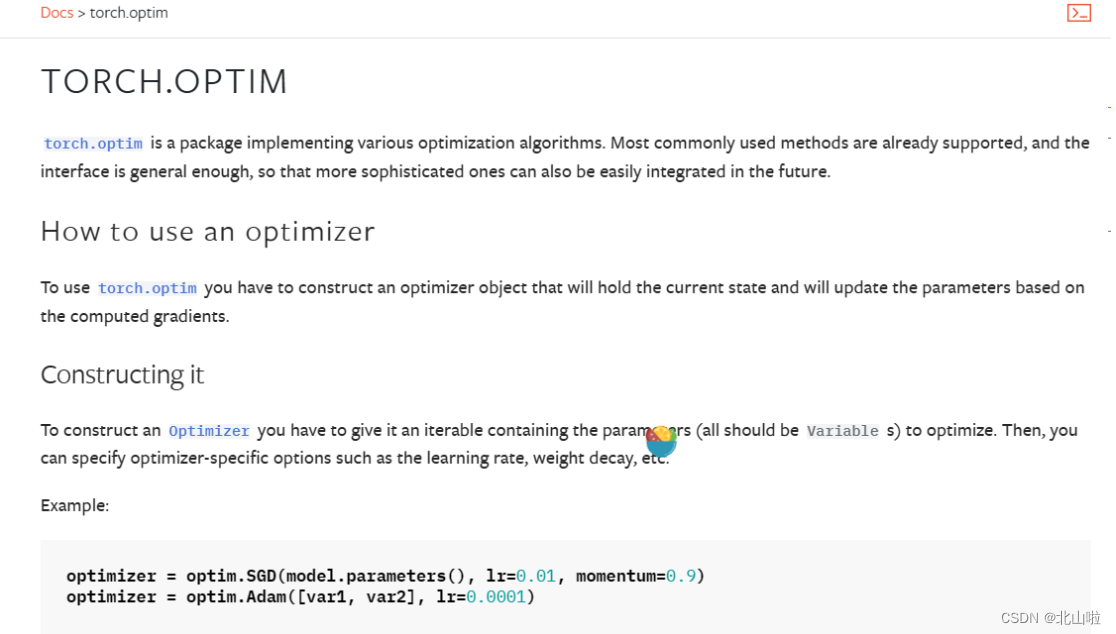
常见的优化器包括:SGD、Adam
optimizer = torch.optim.SGD(model.parameters(), lr=learning_rate)
optimizer = torch.optim.Adam(model.parameters(), lr=learning_rate)
model.parameters()用于获取模型的可学习参数
learning rate,lr表示学习率,即每次参数更新的步长
在每个训练批次中,需要执行以下操作:
-
输入训练数据到模型中,进行前向传播
-
根据损失函数计算损失
-
调用优化器的zero_grad()方法清零之前的梯度
-
调用backward()方法进行反向传播,计算梯度
-
调用优化器的step()方法更新模型参数
伪代码如下(运行不了的)
import torch
import torch.optim as optim# Step 1: 定义模型
model = ...
# Step 2: 定义优化器
optimizer = optim.SGD(model.parameters(), lr=0.01)
# Step 3: 定义损失函数
criterion = ...
# Step 4: 训练循环
for inputs, labels in dataloader:# 前向传播outputs = model(inputs)# 计算损失loss = criterion(outputs, labels)# 清零梯度optimizer.zero_grad()# 反向传播,得到梯度loss.backward()# 更新参数,根据梯度就行优化optimizer.step()
在上述模型代码中,SGD作为优化器,lr为0.01。同时根据具体任务选择适合的损失函数,例如torch.nn.CrossEntropyLoss、torch.nn.MSELoss等,以CIFRA10为例
import torch
import torch.optim as optim
import torchvision
from torch.utils.data import DataLoaderdataset = torchvision.datasets.CIFAR10(root="dataset", train=False, transform=torchvision.transforms.ToTensor(),download=True)
dataloader = DataLoader(dataset,batch_size=1)
class BS(nn.Module):def __init__(self):super().__init__()self.model = nn.Sequential(nn.Conv2d(in_channels=3,out_channels=32,kernel_size=5,stride=1,padding=2),  #stride和padding计算得到nn.MaxPool2d(kernel_size=2),nn.Conv2d(in_channels=32,out_channels=32,kernel_size=5,stride=1,padding=2),nn.MaxPool2d(kernel_size=2),nn.Conv2d(in_channels=32,out_channels=64,kernel_size=5,padding=2),nn.MaxPool2d(kernel_size=2),nn.Flatten(),  #变为64*4*4=1024nn.Linear(in_features=1024, out_features=64),nn.Linear(in_features=64, out_features=10),)def forward(self, x):x = self.model(x)return xmodel = BS()  #定义model
optimizer = optim.SGD(model.parameters(), lr=0.01)  #定义优化器SGD
criterion = nn.CrossEntropyLoss()  #定义损失函数,交叉熵损失函数'''循环一次,只对数据就行了一轮的学习'''
for inputs, labels in dataloader:# 前向传播outputs = model(inputs)# 计算损失loss = criterion(outputs, labels)# 清零梯度optimizer.zero_grad()# 反向传播loss.backward()# 更新参数optimizer.step()# 打印经过优化器后的结果print(loss)"""训练循环20次"""
# for epoch in range(20):
#     running_loss = 0.0
#     for inputs, labels in dataloader:
#         # 前向传播
#         outputs = model(inputs)
#         # 计算损失
#         loss = criterion(outputs,labels)
#         # 清零梯度
#         optimizer.zero_grad()
#         # 反向传播
#         loss.backward()
#         # 更新参数
#         optimizer.step()
#         # 打印经过优化器后的结果
#         running_loss = running_loss + loss
#     print(running_loss)
Files already downloaded and verified
tensor(2.3942, grad_fn=<NllLossBackward0>)
tensor(2.2891, grad_fn=<NllLossBackward0>)
tensor(2.2345, grad_fn=<NllLossBackward0>)
tensor(2.2888, grad_fn=<NllLossBackward0>)
tensor(2.2786, grad_fn=<NllLossBackward0>)
........
