安徽大学最近消息国际站seo优化是什么意思
0.Matplotlib绘图和可视化
1.简介
我的前面两篇文章介绍了 Nimpy ,Pandas 。今天来介绍一下Matplotlib。
简单来说,Matplotlib 是 Python 的一个绘图库。它包含了大量的工具,你可以使用这些工具创建各种图形,包括简单的散点图,正弦曲线,甚至是三维图形。Python 科学计算社区经常使用它完成数据可视化的工作。
你可以在他们的网站上了解到更多 Matplotlib 背后的设计思想,但是我强烈建议你先浏览一下他们的图库,体会一下这个库的各种神奇功能。
2.画一个简单的图形
In [1]: import matplotlib.pyplot as pltIn [2]: import numpy as npIn [3]: x = np.linspace(0, 2 * np.pi, 50)In [6]: plt.plot(x, np.sin(x))
Out[6]: [<matplotlib.lines.Line2D at 0x1dcdc98a748>]In [7]: plt.show()上面的代码将画出一个简单的正弦曲线。np.linspace(0, 2 * np.pi, 50)这段代码将会生成一个包含 50 个元素的数组,这 50 个元素均匀的分布在 [0, 2pi] 的区间上。
plot命令以一种简洁优雅的方式创建了图形。提醒一下,如果没有第一个参数 x,图形的 x 轴坐标将不再是 0 到 2pi,而应该是数组的索引范围。
最后一行代码 plt.show()将图形显示出来,如果没有这行代码图像就不会显示。
运行代码后应该会类似得到下面的图形:

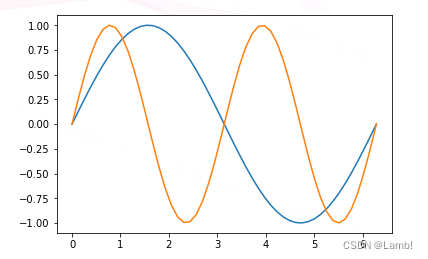
3.在一张图上绘制两个数据集
大多数时候读者可能更想在一张图上绘制多个数据集。用 Matplotlib 也可以轻松实现这一点。
In [15]: x = np.linspace(0, 2 * np.pi, 50)In [16]: plt.plot(x, np.sin(x), x, np.sin(2*x))
Out[16]:
[<matplotlib.lines.Line2D at 0x1dcdb38a080>,<matplotlib.lines.Line2D at 0x1dcdb38a1d0>]In [17]: plt.show()
上面的代码同时绘制了表示函数 sin(x) 和 sin(2x) 的图形。这段代码和前面绘制一个数据集的代码几乎完全相同,只有一点例外,这段代码在调用plt.plot()的时候多传入了一个数据集,并用逗号与第一个数据集分隔开。
最后你会得到类似于下面包含两条曲线的图形:
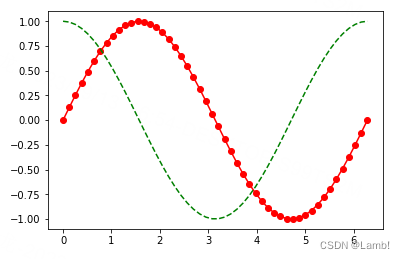
4.自定义图形的外观
当在同一个图形上展示多个数据集时,通过改变线条的外观来区分不同的数据集变得非常必要。
In [18]: x = np.linspace(0, 2*np.pi, 50)In [19]: plt.plot(x, np.sin(x), 'r-o', x, np.cos(x), 'g--')
Out[19]:
[<matplotlib.lines.Line2D at 0x1dcdb695898>,<matplotlib.lines.Line2D at 0x1dcdb695a20>]In [20]: plt.show()上述代码展示了两种不同的曲线样式:'r-o' 和 'g--'。字母 'r' 和 'g' 代表线条的颜色,后面的符号代表线和点标记的类型。例如 '-o' 代表包含实心点标记的实线,'--' 代表虚线。其他的参数需要读者自己去尝试,这也是学习 Matplotlib 最好的方式。
颜色: 蓝色 - 'b' 绿色 - 'g' 红色 - 'r' 青色 - 'c' 品红 - 'm' 黄色 - 'y' 黑色 - 'k'('b'代表蓝色,所以这里用黑色的最后一个字母) 白色 - 'w' 线: 直线 - '-' 虚线 - '--' 点线 - ':' 点划线 - '-.' 常用点标记 点 - '.' 像素 - ',' 圆 - 'o' 方形 - 's' 三角形 - '^'
更多点标记样式点击这里
最后你会得到类似下面的图形:
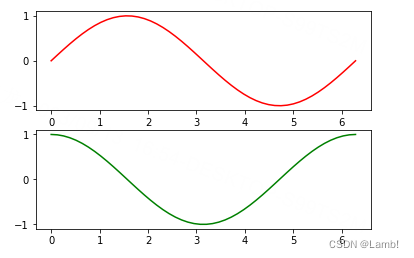
5.使用子图
使用子图可以在一个窗口绘制多张图。
In [21]: x = np.linspace(0, 2*np.pi, 50)In [22]: plt.subplot(2, 1, 1)   # (行,列,活跃区)
Out[22]: <matplotlib.axes._subplots.AxesSubplot at 0x1dcdb6ba978>In [23]: plt.plot(x, np.sin(x), 'r')
Out[23]: [<matplotlib.lines.Line2D at 0x1dcdb7316d8>]In [24]: plt.subplot(2, 1, 2)
Out[24]: <matplotlib.axes._subplots.AxesSubplot at 0x1dcdb731ba8>In [25]: plt.plot(x, np.cos(x), 'g')
Out[25]: [<matplotlib.lines.Line2D at 0x1dcdb77bfd0>]In [26]: plt.show()
使用子图只需要一个额外的步骤,就可以像前面的例子一样绘制数据集。即在调用 plot() 函数之前需要先调用 subplot() 函数。该函数的第一个参数代表子图的总行数,第二个参数代表子图的总列数,第三个参数代表活跃区域。
活跃区域代表当前子图所在绘图区域,绘图区域是按从左至右,从上至下的顺序编号。例如在 4×4 的方格上,活跃区域 6 在方格上的坐标为 (2, 2)。
最终你会得到类似下面的图形:
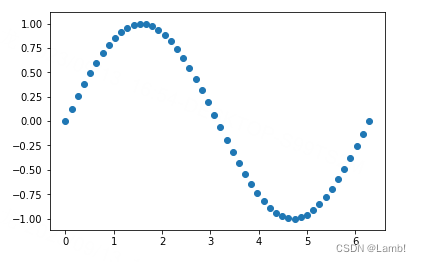
散点图是一堆离散点的集合。用 Matplotlib 画散点图也同样非常简单。
In [27]: x = np.linspace(0, 2*np.pi, 50)In [28]: y = np.sin(x)In [29]: plt.scatter(x, y)
Out[29]: <matplotlib.collections.PathCollection at 0x1dcddb706a0>In [30]: plt.show()
正如上面代码所示,你只需要调用 scatter() 函数并传入两个分别代表 x 坐标和 y 坐标的数组。注意,我们通过 plot 命令并将线的样式设置为 'bo' 也可以实现同样的效果。
最后你会得到类似下面的无线图形:
7.彩色映射散点图
另一种你可能用到的图形是彩色映射散点图。这里我们会根据数据的大小给每个点赋予不同的颜色和大小,并在图中添加一个颜色栏。
In [31]: x = np.random.rand(1000)In [32]: y = np.random.rand(1000)In [33]: size = np.random.rand(1000) * 50In [34]: colour = np.random.rand(1000)In [35]: plt.scatter(x, y, size, colour)
Out[35]: <matplotlib.collections.PathCollection at 0x1dcdde984e0>In [36]: plt.colorbar()
Out[36]: <matplotlib.colorbar.Colorbar at 0x1dcddece0b8>In [37]: plt.show()
上面的代码大量的用到了 np.random.rand(1000),原因是我们绘图的数据都是随机产生的。
同前面一样我们用到了 scatter() 函数,但是这次我们传入了另外的两个参数,分别为所绘点的大小和颜色。通过这种方式使得图上点的大小和颜色根据数据的大小产生变化。
然后我们用 colorbar() 函数添加了一个颜色栏。
最后你会得到类似于下面的彩色散点图:

8.直方图
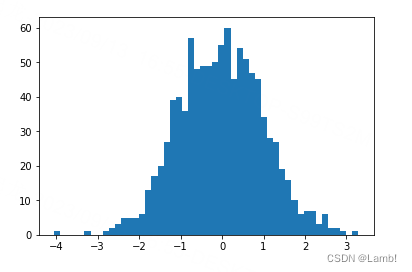
直方图是另一种常见的图形,也可以通过几行代码创建出来。
In [38]: x = np.random.randn(1000)In [39]: plt.hist(x, 50)
Out[39]:
(array([ 2.,  0.,  0.,  1.,  2.,  2.,  1.,  0.,  1.,  1.,  9.,  6., 11.,16., 20., 18., 23., 26., 34., 25., 42., 31., 52., 40., 38., 56.,35., 49., 49., 41., 44., 46., 46., 31., 30., 32., 26., 24., 24.,16.,  8.,  5., 12.,  4.,  4.,  5.,  2.,  7.,  2.,  1.]),array([-3.32384545, -3.20164134, -3.07943724, -2.95723314, -2.83502904,-2.71282494, -2.59062084, -2.46841674, -2.34621264, -2.22400854,-2.10180443, -1.97960033, -1.85739623, -1.73519213, -1.61298803,-1.49078393, -1.36857983, -1.24637573, -1.12417163, -1.00196752,-0.87976342, -0.75755932, -0.63535522, -0.51315112, -0.39094702,-0.26874292, -0.14653882, -0.02433471,  0.09786939,  0.22007349,0.34227759,  0.46448169,  0.58668579,  0.70888989,  0.83109399,0.95329809,  1.0755022 ,  1.1977063 ,  1.3199104 ,  1.4421145 ,1.5643186 ,  1.6865227 ,  1.8087268 ,  1.9309309 ,  2.05313501,2.17533911,  2.29754321,  2.41974731,  2.54195141,  2.66415551,2.78635961]),<a list of 50 Patch objects>)In [40]: plt.show()
直方图是 Matplotlib 中最简单的图形之一。你只需要给 hist() 函数传入一个包含数据的数组。第二个参数代表数据容器的个数。数据容器代表不同的值的间隔,并用来包含我们的数据。数据容器越多,图形上的数据条就越多。
最终你会得到类似下面的直方图:
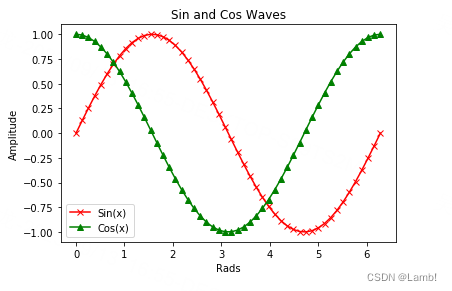
9.标题,标签和图例
当需要快速创建图形时,你可能不需要为图形添加标签。但是当构建需要展示的图形时,你就需要添加标题,标签和图例。
In [41]: x = np.linspace(0, 2*np.pi, 50)In [42]: plt.plot(x, np.sin(x), 'r-x', label='Sin(x)')
Out[42]: [<matplotlib.lines.Line2D at 0x1dcde55db00>]In [43]: plt.plot(x, np.cos(x), 'g-^', label='Cos(x)')
Out[43]: [<matplotlib.lines.Line2D at 0x1dcde282ac8>]In [44]: plt.legend()  # 展示图例
Out[44]: <matplotlib.legend.Legend at 0x1dcde282dd8>In [45]: plt.xlabel('Rads')  # 给x轴添加标签
Out[45]: Text(0.5,0,'Rads')In [46]: plt.ylabel('Amplitude')  # 给y轴添加标签
Out[46]: Text(0,0.5,'Amplitude')In [47]: plt.title('Sin and Cos Waves')  # 添加图形标题
Out[47]: Text(0.5,1,'Sin and Cos Waves')In [48]: plt.show()
为了给图形添加图例,我们需要在 plot() 函数中添加命名参数 'label' 并赋予该参数相应的标签。然后调用 legend() 函数就会在我们的图形中添加图例。
接下来我们只需要调用函数 title(),xlabel() 和 ylabel() 就可以为图形添加标题和标签。
你会得到类似于下面这张拥有标题、标签和图例的图形:
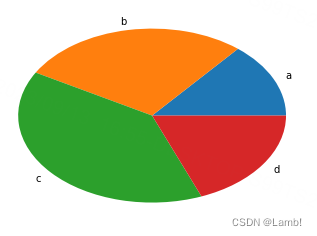
10.饼图
饼图阴影、分裂等属性设置:
# labels参数设置每一块的标签;# labeldistance参数设置标签距离圆心的距离(比例值)# autopct参数设置比例值小数保留位(%.3f%%);# pctdistance参数设置比例值文字距离圆心的距离# explode参数设置每一块顶点距圆心的长度(比例值,列表);# colors参数设置每一块的颜色(列表);# shadow参数为布尔值,设置是否绘制阴影# startangle参数设置饼图起始角度饼图适合展示各部分占总体的比例,条形图适合比较各部分的大小
In [51]: x = [11, 22, 33, 44]In [52]: plt.pie(x, labels=['a', 'b', 'c', 'd'])
Out[52]:
([<matplotlib.patches.Wedge at 0x1dcde8894a8>,<matplotlib.patches.Wedge at 0x1dcde8899b0>,<matplotlib.patches.Wedge at 0x1dcde889e80>,<matplotlib.patches.Wedge at 0x1dcde891390>],[Text(1.04616,0.339919,'a'),Text(0.339919,1.04616,'b'),Text(-1.04616,0.339919,'c'),Text(0.339919,-1.04616,'d')])In [53]: plt.show()
最终你会得到类似下面的饼图: