信阳做房产哪个网站好用云南最新消息
目录
- 一、说明
- 二、纹理贴图原理
- 2.1 纹理融合原理
- 2.2 UV坐标原理
- 三、生成纹理对象
- 3.1 需要在VAO上绑定纹理坐标
- 3.2 纹理传递
- 3.3 纹理buffer生成
- 四、代码实现:
- 五、着色器
- 4.1 片段
- 4.2 顶点
- 五、后记
一、说明
本篇叙述在画出图元的时候,如何贴图纹理图片。和纹理坐标的原理实现,以及纹理如何生成,和如何传递进入着色器。对以上进行解说,并附上源代码。
二、纹理贴图原理
2.1 纹理融合原理
1 融合blend的条件
- 要使用OpenGL的混合功能,只需要调用:glEnable(GL_BLEND);即可。
- 要关闭OpenGL的混合功能,只需要调用:glDisable(GL_BLEND);即可。
- 注意:只有在RGBA模式下,才可以使用混合功能,颜色索引模式下是无法使用混合功能的。
2 glBlendFunc() 融合函数
如:
C o l o r n e w = α C o l o r f r e g + ( 1 − α ) C o l o r t e x t i r e ( α ∈ [ 0 , 1 ] ) Color_{new} =\alpha Color_{freg}+ (1-\alpha) Color_{textire} \;\;\; ( \alpha \in[0,1]) Colornew=αColorfreg+(1−α)Colortextire(α∈[0,1])
除此之外,还有新的算法。新版本的OpenGL可以设置运算方式,包括加、减、取两者中较大的、取两者中较小的、逻辑运算等)下表:
| 选择宏代码 | 意义 |
|---|---|
| GL_ZERO | 表示使用0.0作为因子,实际上相当于不使用这种颜色参与混合运算。 |
| GL_ONE | 表示使用1.0作为因子,实际上相当于完全的使用了这种颜色参与混合运算。 |
| GL_SRC_ALPHA | 表示使用源颜色的alpha值来作为因子。 |
| GL_DST_ALPHA | 表示使用目标颜色的alpha值来作为因子。 |
| GL_ONE_MINUS_SRC_ALPHA | 表示用1.0减去源颜色的alpha值来作为因子(1-alpha)。 |
| GL_ONE_MINUS_DST_ALPHA | 表示用1.0减去目标颜色的alpha值来作为因子。 |
| GL_SRC_COLOR | (把源颜色的四个分量分别作为因子的四个分量) |
| GL_ONE_MINUS_SRC_COLOR | xxx |
| GL_DST_COLOR | xxx |
| GL_ONE_MINUS_DST_COLOR | 前两个在OpenGL旧版本中只能用于设置目标因子,后两个在OpenGL 旧版本中只能用于设置源因子。新版本的OpenGL则没有这个限制,并且支持新的 |
| GL_CONST_COLOR | (设定一种常数颜色,将其四个分量分别作为 因子的四个分量)GL_ONE_MINUS_CONST_COLOR |
| GL_CONST_ALPHA | xx |
| GL_ONE_MINUS_CONST_ALPHA | xxx |
| GL_SRC_ALPHA_SATURATE | 新版本的OpenGL还允许颜色的alpha 值和RGB值采用不同的混合因子 |
举例来说: 如果设置了glBlendFunc(GL_ONE, GL_ZERO);,则表示完全使用源颜色,完全不使用目标颜色,因此画面效果和不使用混合的时候一致(当然效率可能会低一点点)。
如果设置了glBlendFunc(GL_SRC_ALPHA, GL_ONE_MINUS_SRC_ALPHA);则表示源颜色乘以自身的alpha 值,目标颜色乘以1.0减去源颜色的alpha值,这样一来,源颜色的alpha值越大,则产生的新颜色中源颜色所占比例就越大,而目标颜色所占比例则减 小。这种情况下,我们可以简单的将源颜色的alpha值理解为“不透明度”。这也是混合时最常用的方式。
如果设置了glBlendFunc(GL_ONE, GL_ONE);,则表示完全使用源颜色和目标颜色,最终的颜色实际上就是两种颜色的简单相加。例如红色(1,0,0)和绿色(0,1,0)相加得到(1,1,0),结果为黄色。
注意: 所 谓源颜色和目标颜色,是跟绘制的顺序有关的。假如先绘制了一个红色的物体,再在其上绘制绿色的物体。则绿色是源颜色,红色是目标颜色。如果顺序反过来,则 红色就是源颜色,绿色才是目标颜色。在绘制时,应该注意顺序,使得绘制的源颜色与设置的源因子对应,目标颜色与设置的目标因子对应。不要被混乱的顺序搞晕 。
2.2 UV坐标原理
这个坐标不是孤立的,而是与被画图元的摆放有关。比如,下图:
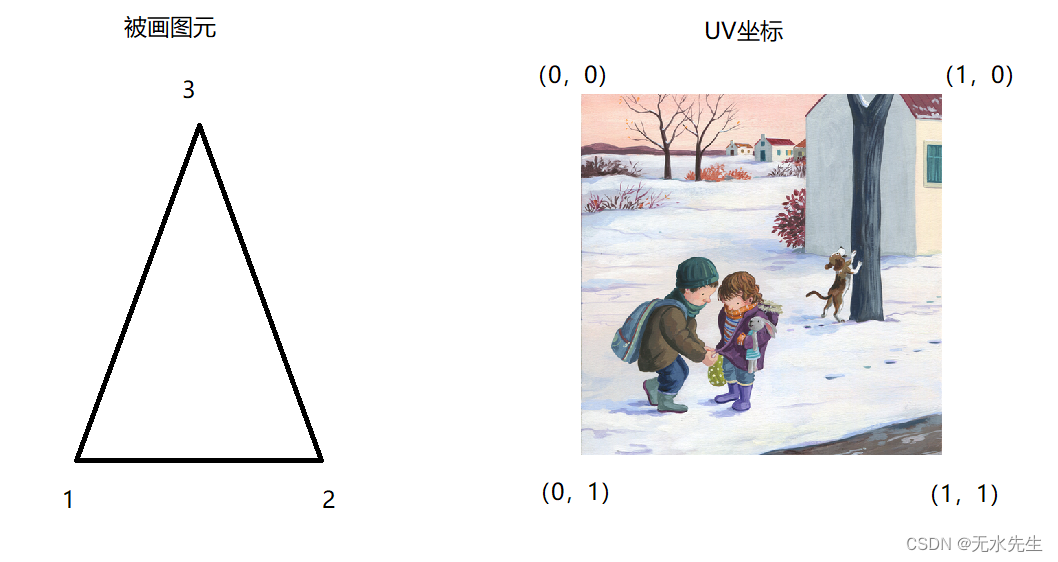
当出现如下配置时:
vertices = (
-0.5, -0.5, 0.0, 1.0, 0.0, 0.0, 0.0, 1.0,
0.5, -0.5, 0.0, 0.0, 1.0, 0.0, 1.0, 1.0,
0.0, 1.0, 0.0, 0.0, 0.0, 1.0, 1.0, 0.0,)
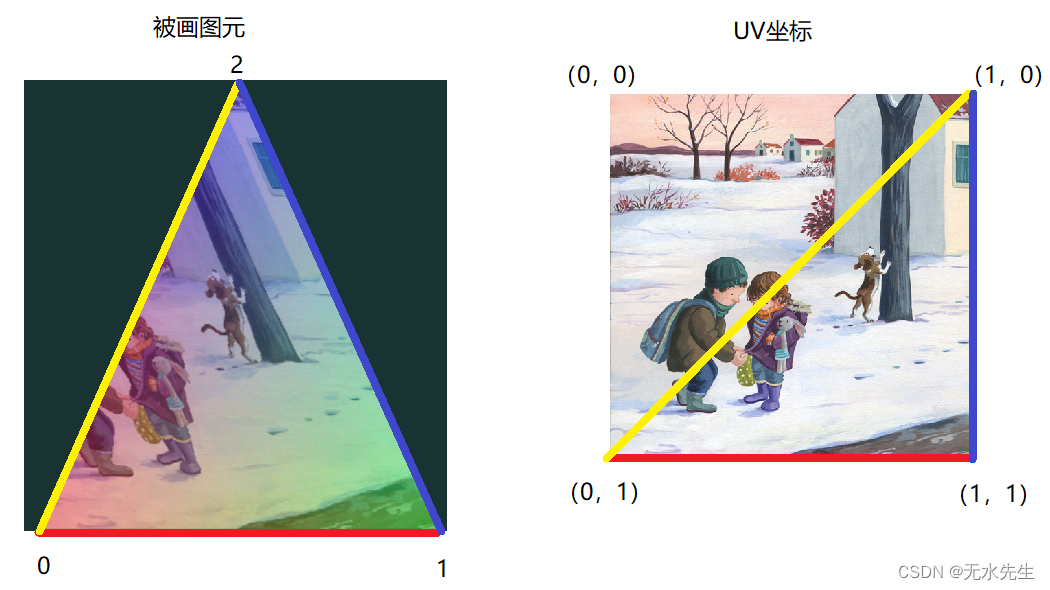
这是一个三角形对另一个三角形的映射。即:
S 1 → S 2 S_1 \rightarrow S_2 S1→S2
这种映射很容易实现,比如:
( a b c d e f 0 0 1 ) ( x 0 y 0 1 ) = ( U 0 V 0 1 ) \begin{pmatrix} a & b& c\\ d & e& f\\ 0 & 0 & 1 \end{pmatrix} \begin{pmatrix} x_0\\ y_0\\ 1 \end{pmatrix} = \begin{pmatrix} U_0\\ V_0\\ 1 \end{pmatrix} ad0be0cf1 x0y01 = U0V01
( a b c d e f 0 0 1 ) ( x 1 y 1 1 ) = ( U 1 V 1 1 ) \begin{pmatrix} a & b& c\\ d & e& f\\ 0 & 0 & 1 \end{pmatrix} \begin{pmatrix} x_1\\ y_1\\ 1 \end{pmatrix} = \begin{pmatrix} U_1\\ V_1\\ 1 \end{pmatrix} ad0be0cf1 x1y11 = U1V11
( a b c d e f 0 0 1 ) ( x 2 y 2 1 ) = ( U 2 V 2 1 ) \begin{pmatrix} a & b& c\\ d & e& f\\ 0 & 0 & 1 \end{pmatrix} \begin{pmatrix} x_2\\ y_2\\ 1 \end{pmatrix} = \begin{pmatrix} U_2\\ V_2\\ 1 \end{pmatrix} ad0be0cf1 x2y21 = U2V21
以上三个方程联立后,就能确定 a , b , c , d , e , f a,b,c,d,e,f a,b,c,d,e,f 从而对任意点插值:
顺便提一下,以上名称叫“仿射变换”,听不懂的,就跟我慢慢学吧!
三、生成纹理对象
3.1 需要在VAO上绑定纹理坐标
glEnableVertexAttribArray(2)
glVertexAttribPointer(2, 2, GL_FLOAT, GL_FALSE, 32, ctypes.c_void_p(24))
3.2 纹理传递
glUniform1i(glGetUniformLocation(self.shader, "imageTexture"), 0)
注意:将Uniform类型传入shade需要执行两步:
1)查找到GPU中名称为"imageTexture"的变量地址
2)将cpu纹理数组传递进GPU,glUniform1i
3.3 纹理buffer生成
self.texture = glGenTextures(1)glBindTexture(GL_TEXTURE_2D, self.texture)glTexParameteri(GL_TEXTURE_2D, GL_TEXTURE_WRAP_S, GL_REPEAT)glTexParameteri(GL_TEXTURE_2D, GL_TEXTURE_WRAP_T, GL_REPEAT)glTexParameteri(GL_TEXTURE_2D, GL_TEXTURE_MIN_FILTER, GL_NEAREST)glTexParameteri(GL_TEXTURE_2D, GL_TEXTURE_MAG_FILTER, GL_LINEAR)image = pg.image.load(filepath).convert_alpha()image_width,image_height = image.get_rect().sizeimg_data = pg.image.tostring(image,'RGBA')glTexImage2D(GL_TEXTURE_2D,0,GL_RGBA,image_width,image_height,0,GL_RGBA,GL_UNSIGNED_BYTE,img_data)glGenerateMipmap(GL_TEXTURE_2D)
四、代码实现:
import pygame as pg
from OpenGL.GL import *
from OpenGL.GL.shaders import compileProgram,compileShader
import numpy as npdef create_shader(vertex_filepath: str, fragment_filepath: str) -> int:"""Compile and link shader modules to make a shader program.Parameters:vertex_filepath: path to the text file storing the vertexsource codefragment_filepath: path to the text file storing thefragment source codeReturns:A handle to the created shader program"""with open(vertex_filepath,'r') as f:vertex_src = f.readlines()with open(fragment_filepath,'r') as f:fragment_src = f.readlines()shader = compileProgram(compileShader(vertex_src, GL_VERTEX_SHADER),compileShader(fragment_src, GL_FRAGMENT_SHADER))return shaderclass App:"""For now, the app will be handling everything.Later on we'll break it into subcomponents."""def __init__(self):""" Initialise the program """self._set_up_pygame()self._set_up_timer()self._set_up_opengl()self._create_assets()self._set_onetime_uniforms()def _set_up_pygame(self) -> None:"""Initialize and configure pygame."""pg.init()pg.display.gl_set_attribute(pg.GL_CONTEXT_MAJOR_VERSION, 3)pg.display.gl_set_attribute(pg.GL_CONTEXT_MINOR_VERSION, 3)pg.display.gl_set_attribute(pg.GL_CONTEXT_PROFILE_MASK, pg.GL_CONTEXT_PROFILE_CORE)pg.display.set_mode((640,480), pg.OPENGL|pg.DOUBLEBUF)def _set_up_timer(self) -> None:"""Set up the app's timer."""self.clock = pg.time.Clock()def _set_up_opengl(self) -> None:"""Configure any desired OpenGL options"""glClearColor(0.1, 0.2, 0.2, 1)glEnable(GL_BLEND)glBlendFunc(GL_SRC_ALPHA, GL_ONE_MINUS_SRC_ALPHA)def _create_assets(self) -> None:"""Create all of the assets needed for drawing."""self.triangle = Triangle()self.wood_texture = Material("gfx/land.png")self.shader = create_shader(vertex_filepath = "shaders/vertex.txt", fragment_filepath = "shaders/fragment.txt")def _set_onetime_uniforms(self) -> None:"""Some shader data only needs to be set once."""glUseProgram(self.shader)glUniform1i(glGetUniformLocation(self.shader, "imageTexture"), 0)def run(self) -> None:""" Run the app """running = Truewhile (running):#check eventsfor event in pg.event.get():if (event.type == pg.QUIT):running = False#refresh screenglClear(GL_COLOR_BUFFER_BIT)glUseProgram(self.shader)self.wood_texture.use()self.triangle.arm_for_drawing()self.triangle.draw()pg.display.flip()#timingself.clock.tick(60)def quit(self) -> None:""" cleanup the app, run exit code """self.triangle.destroy()self.wood_texture.destroy()glDeleteProgram(self.shader)pg.quit()class Triangle:"""Yep, it's a triangle."""def __init__(self):"""Initialize a triangle."""# x, y, z, r, g, b, s, tvertices = (-0.5, -0.5, 0.0, 1.0, 0.0, 0.0, 0.0, 1.0,0.5, -0.5, 0.0, 0.0, 1.0, 0.0, 1.0, 1.0,0, 1, 0.0, 0.0, 0.0, 1.0, 1, 0.0,-0.5, 0.0, 0.0, 1.0, 0.0, 1.0,  0.0, 1.0,0.25, 0.5, 0.0, 1.0, 0.0, 1.0, 1.0, 1.0,-0.25, 0.5, 0.0, 1.0, 0.0, 1.0, 1.0, 0.0 )vertices = np.array(vertices, dtype=np.float32)self.vertex_count = 3self.vao = glGenVertexArrays(1)glBindVertexArray(self.vao)self.vbo = glGenBuffers(1)glBindBuffer(GL_ARRAY_BUFFER, self.vbo)glBufferData(GL_ARRAY_BUFFER, vertices.nbytes, vertices, GL_STATIC_DRAW)glEnableVertexAttribArray(0)glVertexAttribPointer(0, 3, GL_FLOAT, GL_FALSE, 32, ctypes.c_void_p(0))glEnableVertexAttribArray(1)glVertexAttribPointer(1, 3, GL_FLOAT, GL_FALSE, 32, ctypes.c_void_p(12))glEnableVertexAttribArray(2)glVertexAttribPointer(2, 2, GL_FLOAT, GL_FALSE, 32, ctypes.c_void_p(24))def arm_for_drawing(self) -> None:"""Arm the triangle for drawing."""glBindVertexArray(self.vao)def draw(self) -> None:"""Draw the triangle."""glDrawArrays(GL_TRIANGLES, 0, self.vertex_count)def destroy(self) -> None:"""Free any allocated memory."""glDeleteVertexArrays(1,(self.vao,))glDeleteBuffers(1,(self.vbo,))class Material:"""A basic texture."""def __init__(self, filepath: str):"""Initialize and load the texture.Parameters:filepath: path to the image file."""self.texture = glGenTextures(1)glBindTexture(GL_TEXTURE_2D, self.texture)glTexParameteri(GL_TEXTURE_2D, GL_TEXTURE_WRAP_S, GL_REPEAT)glTexParameteri(GL_TEXTURE_2D, GL_TEXTURE_WRAP_T, GL_REPEAT)glTexParameteri(GL_TEXTURE_2D, GL_TEXTURE_MIN_FILTER, GL_NEAREST)glTexParameteri(GL_TEXTURE_2D, GL_TEXTURE_MAG_FILTER, GL_LINEAR)image = pg.image.load(filepath).convert_alpha()image_width,image_height = image.get_rect().sizeimg_data = pg.image.tostring(image,'RGBA')glTexImage2D(GL_TEXTURE_2D,0,GL_RGBA,image_width,image_height,0,GL_RGBA,GL_UNSIGNED_BYTE,img_data)glGenerateMipmap(GL_TEXTURE_2D)def use(self) -> None:"""Arm the texture for drawing."""glActiveTexture(GL_TEXTURE0)glBindTexture(GL_TEXTURE_2D,self.texture)def destroy(self) -> None:"""Free the texture."""glDeleteTextures(1, (self.texture,))my_app = App()
my_app.run()
my_app.quit()
五、着色器
4.1 片段
着色器需要将纹理图片的具体数据带入进来,是通过uniform sampler2D类型数据带入的。最后的颜色,是顶点固有color和imageTexture融合的结果。
fragment.txt
#version 330 corein vec3 fragmentColor;
in vec2 fragmentTexCoord;out vec4 color;uniform sampler2D imageTexture;void main()
{color = 0.4*vec4(fragmentColor, 1.0) + 0.6*texture(imageTexture, fragmentTexCoord);
}
4.2 顶点
顶点输入时候,顺便将该顶点所对应的纹理图片坐标带入。
#version 330 corelayout (location=0) in vec3 vertexPos;
layout (location=1) in vec3 vertexColor;
layout (location=2) in vec2 vertexTexCoord;out vec3 fragmentColor;
out vec2 fragmentTexCoord;void main()
{gl_Position = vec4(vertexPos, 1.0);fragmentColor = vertexColor;fragmentTexCoord = vertexTexCoord;
}
五、后记
我承认有一些细节没有写出,如果读者需要更详细资料,请从资源中下载源码:
xxxxx