辽宁建设工程信息网218蜘蛛seo超级外链工具
一、说明
近年来,卷积神经网络已成为计算机视觉领域的主要算法,开发设计它们的方法一直是相当的关注。Inception模型似乎能够用更少的参数学习更丰富的表示。它们是如何工作的,以及它们与常规卷积有何不同?本文将用tensorflow实现,用具体实践展现它的结构。

卷积神经网络(CNN)已经走了很长一段路,从LeNet风格的AlexNet,VGG模型,它使用简单的卷积层堆栈进行特征提取,最大池化层用于空间子采样,一个接一个地堆叠,到Inception和ResNet网络,它们在每层中使用跳过连接和多个卷积和最大池块。自推出以来,计算机视觉中最好的网络之一就是Inception网络。Inception 模型使用一堆模块,每个模块包含一堆特征提取器,这允许它们使用更少的参数学习更丰富的表示。
Xception论文— https://arxiv.org/abs/1610.02357
如图 1 所示,Xception 模块有 3 个主要部分。入口流、中间流(重复 8 次)和退出流。

入口流有两个卷积层块,然后是 ReLU 激活。该图还详细提到了过滤器的数量、过滤器大小(内核大小)和步长。
还有各种可分离卷积层。还有最大池化层。当步幅与步幅不同时,还会提到步幅。还有 Skip 连接,我们使用“ADD”来合并两个张量。它还显示了每个流中输入张量的形状。例如,我们从 299x299x3 的图像大小开始,在输入流程之后,我们得到的图像大小为 19x19x728。

图3.Xception架构的中出流程
同样,对于中间流和退出流,此图清楚地解释了图像大小、各个层、滤镜数量、滤镜形状、池化类型、重复次数以及最终添加全连接层的选项。
此外,所有卷积和可分离卷积层之后都经过批量归一化。
二、可分离卷积层
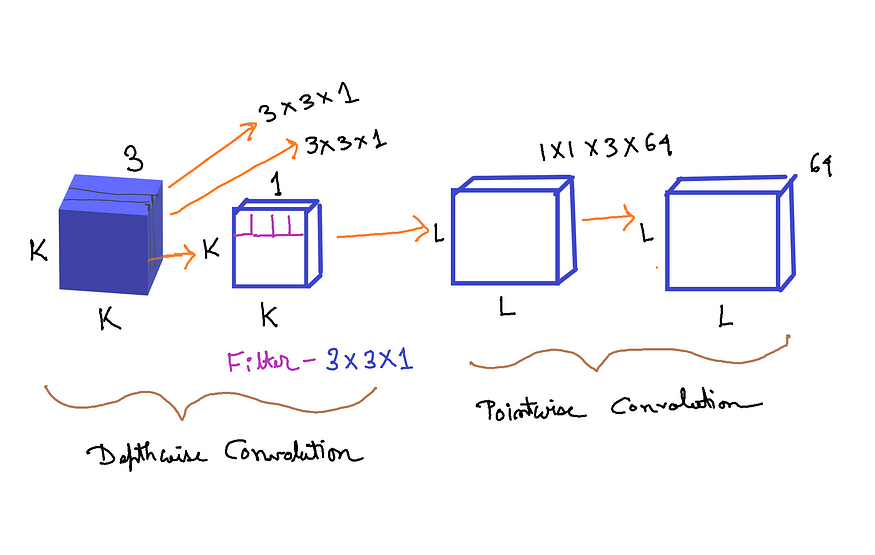
图4.可分离卷积层(来源:作者创建的图像)
可分离卷积包括首先执行深度空间卷积(分别作用于每个输入通道),然后是逐点卷积,混合生成的输出通道。 来自 Keras 文档
假设我们有一个大小为 (K, K,3) 的输入张量。K 是空间维度,3 是特征图/通道的数量。正如我们从上面的 Keras 文档中看到的,首先我们需要在每个输入通道上分别实现深度空间卷积。所以我们使用 K, K,1 — 图像/张量的第一个通道。假设我们使用大小为 3x3x1 的过滤器。并且此过滤器应用于输入张量的所有三个通道。由于有 3 个通道,所以我们得到的尺寸是 3x3x1x3。如图 4 的深度卷积部分所示。
在此之后,将所有 3 个输出放在一起,我们得到大小为 (L, L,3) 的张量。L 的维度可以与 K 相同,也可以不同,具体取决于先前卷积中使用的步幅和填充。
然后应用逐点卷积。滤波器尺寸为 1x1x3(3 个通道)。过滤器的数量可以是我们想要的任意数量的过滤器。假设我们使用 64 个过滤器。因此,总尺寸为 1x1x3x64。最后,我们得到大小为 LxLx64 的输出张量。 如图 4 的逐点卷积部分所示。
为什么可分离卷积比普通卷积更好?
如果我们在输入张量上使用法线卷积,并且我们使用 3x3x3 的过滤器/内核大小(内核大小 — (3,3) 和 3 个特征图)。我们想要的过滤器总数是 64。所以总共有 3x3x3x64。
相反,在可分离卷积中,我们首先在深度卷积中使用 3x3x1x3,在逐点卷积中使用 1x1x3x64。
区别在于过滤器的维度。
传统卷积层 = 3x3x3x64 = 1,728
可分离卷积层 = (3x3x1x3)+(1x1x3x64) = 27+192 = 219
正如我们所看到的,可分离卷积层在计算成本和内存方面都比传统的卷积层更具优势。主要区别在于,在正常卷积中,我们会多次转换图像。每次变换都会使用 3x3x3x64 = 1,728 次乘法。在可分离卷积中,我们只转换图像一次——在深度卷积中。然后,我们获取转换后的图像并将其简单地拉长到 64 个通道。无需一遍又一遍地转换图像,我们可以节省计算能力。

图5.Xception性能与ImageNet上的Inception(来源:图片来自原始论文)

Figure 6. Xception performance vs Inception on JFT dataset (Source: Image from the original paper)
Algorithm:
- 导入所有必要的图层
- 为以下各项编写所有必要的函数:
一个。转换-批处理范数块
b. 可分离卷积 - 批处理范数块
3. 为 3 个流(入口、中间和退出)中的每一个编写一个函数
4. 使用这些函数构建完整的模型
三、使用 Tensorflow 创建 Xception
#import necessary librariesimport tensorflow as tf
from tensorflow.keras.layers import Input,Dense,Conv2D,Add
from tensorflow.keras.layers import SeparableConv2D,ReLU
from tensorflow.keras.layers import BatchNormalization,MaxPool2D
from tensorflow.keras.layers import GlobalAvgPool2D
from tensorflow.keras import Model
创建 Conv-BatchNorm 块:
# creating the Conv-Batch Norm blockdef conv_bn(x, filters, kernel_size, strides=1):x = Conv2D(filters=filters, kernel_size = kernel_size, strides=strides, padding = 'same', use_bias = False)(x)x = BatchNormalization()(x)
return x
Conv-Batch 范数块将张量 — x、过滤器数量 — 过滤器、卷积层的核大小 — kernel_size, 卷积层的步幅作为输入。然后我们将卷积层应用于 x,然后应用批量归一化。我们加上use_bias = False,这样最终模型的参数数量,将与原始论文的参数数量相同。
创建可分离的Conv-BatchNorm块:
# creating separableConv-Batch Norm blockdef sep_bn(x, filters, kernel_size, strides=1):x = SeparableConv2D(filters=filters, kernel_size = kernel_size, strides=strides, padding = 'same', use_bias = False)(x)x = BatchNormalization()(x)
return x
与 Conv-Batch Norm 块的结构类似,只是我们使用 SeparableConv2D 而不是 Conv2D。
入口、中间和退出流的函数:
# entry flowdef entry_flow(x):x = conv_bn(x, filters =32, kernel_size =3, strides=2)x = ReLU()(x)x = conv_bn(x, filters =64, kernel_size =3, strides=1)tensor = ReLU()(x)x = sep_bn(tensor, filters = 128, kernel_size =3)x = ReLU()(x)x = sep_bn(x, filters = 128, kernel_size =3)x = MaxPool2D(pool_size=3, strides=2, padding = 'same')(x)tensor = conv_bn(tensor, filters=128, kernel_size = 1,strides=2)x = Add()([tensor,x])x = ReLU()(x)x = sep_bn(x, filters =256, kernel_size=3)x = ReLU()(x)x = sep_bn(x, filters =256, kernel_size=3)x = MaxPool2D(pool_size=3, strides=2, padding = 'same')(x)tensor = conv_bn(tensor, filters=256, kernel_size = 1,strides=2)x = Add()([tensor,x])x = ReLU()(x)x = sep_bn(x, filters =728, kernel_size=3)x = ReLU()(x)x = sep_bn(x, filters =728, kernel_size=3)x = MaxPool2D(pool_size=3, strides=2, padding = 'same')(x)tensor = conv_bn(tensor, filters=728, kernel_size = 1,strides=2)x = Add()([tensor,x])
return x
这里我们只遵循图 2。它从两个分别具有 32 个和 64 个过滤器的 Conv 层开始。每个之后都有一个 ReLU 激活。
然后有一个跳过连接,这是通过使用 Add 完成的。
在每个跳过连接块中,有两个可分离的 Conv 层,后跟 MaxPooling。跳过连接本身具有 1x1 的 Conv 层,步幅为 2。

图7.中流(来源:原文图片)
# middle flowdef middle_flow(tensor):for _ in range(8):x = ReLU()(tensor)x = sep_bn(x, filters = 728, kernel_size = 3)x = ReLU()(x)x = sep_bn(x, filters = 728, kernel_size = 3)x = ReLU()(x)x = sep_bn(x, filters = 728, kernel_size = 3)x = ReLU()(x)tensor = Add()([tensor,x])return tensor中间流程遵循图 7 中所示的步骤。

图8.退出流程(来源:图片来自原文)
# exit flowdef exit_flow(tensor):x = ReLU()(tensor)x = sep_bn(x, filters = 728, kernel_size=3)x = ReLU()(x)x = sep_bn(x, filters = 1024, kernel_size=3)x = MaxPool2D(pool_size = 3, strides = 2, padding ='same')(x)tensor = conv_bn(tensor, filters =1024, kernel_size=1, strides =2)x = Add()([tensor,x])x = sep_bn(x, filters = 1536, kernel_size=3)x = ReLU()(x)x = sep_bn(x, filters = 2048, kernel_size=3)x = GlobalAvgPool2D()(x)x = Dense (units = 1000, activation = 'softmax')(x)return x退出流程遵循如图 8 所示的步骤。
四、创建Xception模型:
# model codeinput = Input(shape = (299,299,3))
x = entry_flow(input)
x = middle_flow(x)
output = exit_flow(x)model = Model (inputs=input, outputs=output)
model.summary()
输出代码段:

from tensorflow.python.keras.utils.vis_utils import model_to_dot
from IPython.display import SVG
import pydot
import graphvizSVG(model_to_dot(model, show_shapes=True, show_layer_names=True, rankdir='TB',expand_nested=False, dpi=60, subgraph=False).create(prog='dot',format='svg'))
输出代码段:

import numpy as np
import tensorflow.keras.backend as K
np.sum([K.count_params(p) for p in model.trainable_weights])
输出:22855952
上面的代码显示了可训练参数的数量。
五、完整代码
使用Tensorflow从头开始创建Xception模型的完整代码:
#import necessary librariesimport tensorflow as tf
from tensorflow.keras.layers import Input,Dense,Conv2D,Add
from tensorflow.keras.layers import SeparableConv2D,ReLU
from tensorflow.keras.layers import BatchNormalization,MaxPool2D
from tensorflow.keras.layers import GlobalAvgPool2D
from tensorflow.keras import Model
# creating the Conv-Batch Norm blockdef conv_bn(x, filters, kernel_size, strides=1):x = Conv2D(filters=filters, kernel_size = kernel_size, strides=strides, padding = 'same', use_bias = False)(x)x = BatchNormalization()(x)
return x
# creating separableConv-Batch Norm blockdef sep_bn(x, filters, kernel_size, strides=1):x = SeparableConv2D(filters=filters, kernel_size = kernel_size, strides=strides, padding = 'same', use_bias = False)(x)x = BatchNormalization()(x)
return x
# entry flowdef entry_flow(x):x = conv_bn(x, filters =32, kernel_size =3, strides=2)x = ReLU()(x)x = conv_bn(x, filters =64, kernel_size =3, strides=1)tensor = ReLU()(x)x = sep_bn(tensor, filters = 128, kernel_size =3)x = ReLU()(x)x = sep_bn(x, filters = 128, kernel_size =3)x = MaxPool2D(pool_size=3, strides=2, padding = 'same')(x)tensor = conv_bn(tensor, filters=128, kernel_size = 1,strides=2)x = Add()([tensor,x])x = ReLU()(x)x = sep_bn(x, filters =256, kernel_size=3)x = ReLU()(x)x = sep_bn(x, filters =256, kernel_size=3)x = MaxPool2D(pool_size=3, strides=2, padding = 'same')(x)tensor = conv_bn(tensor, filters=256, kernel_size = 1,strides=2)x = Add()([tensor,x])x = ReLU()(x)x = sep_bn(x, filters =728, kernel_size=3)x = ReLU()(x)x = sep_bn(x, filters =728, kernel_size=3)x = MaxPool2D(pool_size=3, strides=2, padding = 'same')(x)tensor = conv_bn(tensor, filters=728, kernel_size = 1,strides=2)x = Add()([tensor,x])
return x
# middle flowdef middle_flow(tensor):for _ in range(8):x = ReLU()(tensor)x = sep_bn(x, filters = 728, kernel_size = 3)x = ReLU()(x)x = sep_bn(x, filters = 728, kernel_size = 3)x = ReLU()(x)x = sep_bn(x, filters = 728, kernel_size = 3)x = ReLU()(x)tensor = Add()([tensor,x])return tensor
# exit flowdef exit_flow(tensor):x = ReLU()(tensor)x = sep_bn(x, filters = 728,  kernel_size=3)x = ReLU()(x)x = sep_bn(x, filters = 1024,  kernel_size=3)x = MaxPool2D(pool_size = 3, strides = 2, padding ='same')(x)tensor = conv_bn(tensor, filters =1024, kernel_size=1, strides =2)x = Add()([tensor,x])x = sep_bn(x, filters = 1536,  kernel_size=3)x = ReLU()(x)x = sep_bn(x, filters = 2048,  kernel_size=3)x = GlobalAvgPool2D()(x)x = Dense (units = 1000, activation = 'softmax')(x)return x
# model codeinput = Input(shape = (299,299,3))
x = entry_flow(input)
x = middle_flow(x)
output = exit_flow(x)model = Model (inputs=input, outputs=output)
model.summary()
六、结论
如图 5 和图 6 所示,与 ImageNet 数据集相比,Xception 架构在 JFT 数据集上的性能改进比 Inception 网络要好得多。Xception的作者认为,这是因为Inception被设计为专注于ImageNet,因此可能过于适合特定任务。另一方面,这两种架构都没有针对JFT数据集进行调优。
此外,Inception 有大约 23 万个参数,而 Xception 有 6 万个参数。
如图 1 所示,Xception 架构在论文中很容易解释,这使得使用 TensorFlow 实现网络架构变得非常容易。